学成在线--课程发布模块开发
在此特别感谢黑马程序员提供的课程
写在最前
模块需求分析
模块介绍
- 课程信息编辑完毕即可发布课程,发布课程相当于一个确认操作,课程发布后,学习者通过学成在线平台的网站可以搜索到课程,然后查看课程的详细信息,选课进行学习。
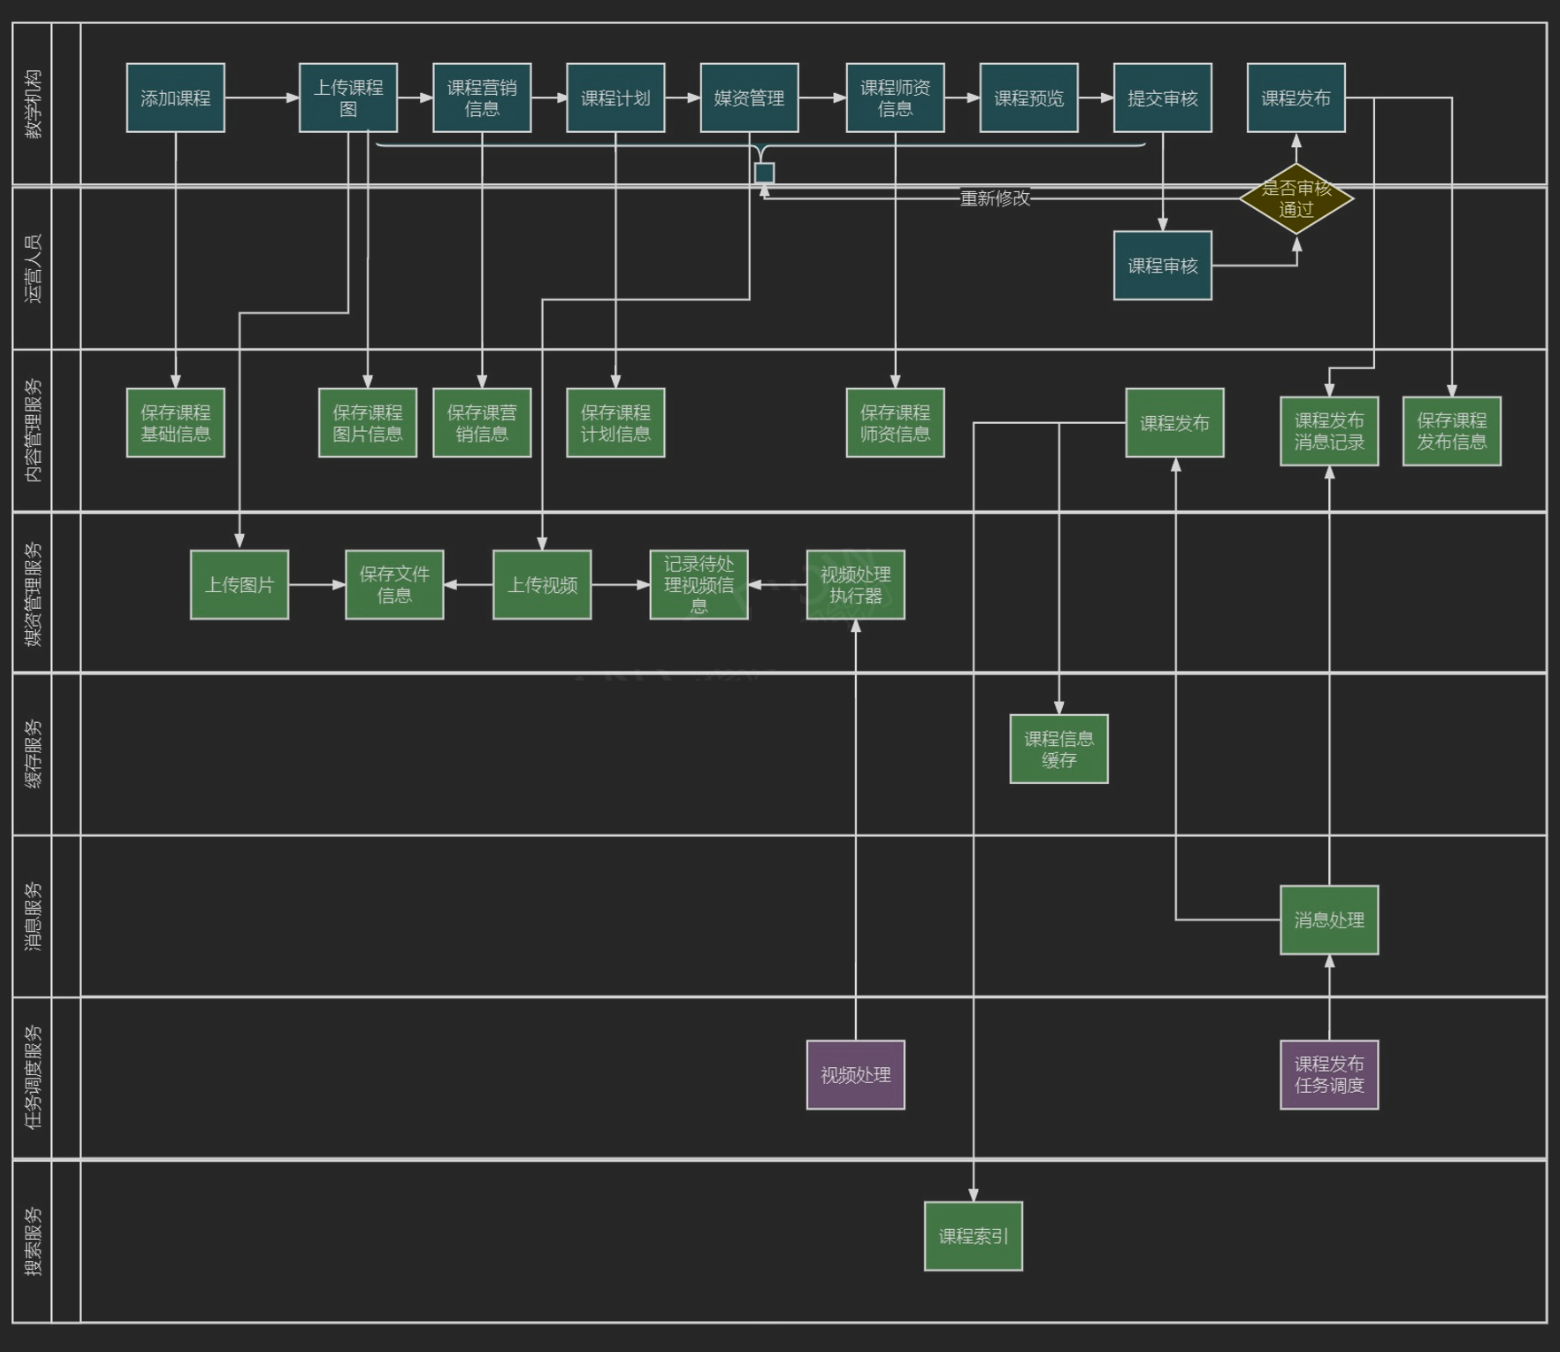
- 下面是课程编辑与发布的整体流程
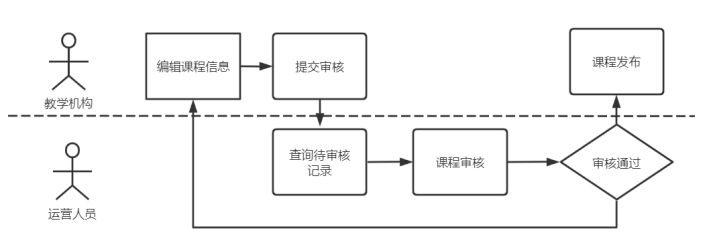
- 为了保证课程内容没有违规信息、课程内容安排合理,在课程发布之前,平台运营方会进行课程审核,审核通过后,课程方可发布
- 作为课程制作方即教学机构,在课程发布前通过课程预览功能可以看到课程发布后的效果,若课程信息存在问题,方便查看,及时修改
- 教学机构确认课程内容无误,提交审核,平台运营人员对课程内容审核,审核通过后教学机构人员发布课程成功
- 课程发布模块共包括三块功能
- 课程预览
- 课程审核
- 课程发布
业务流程
课程预览
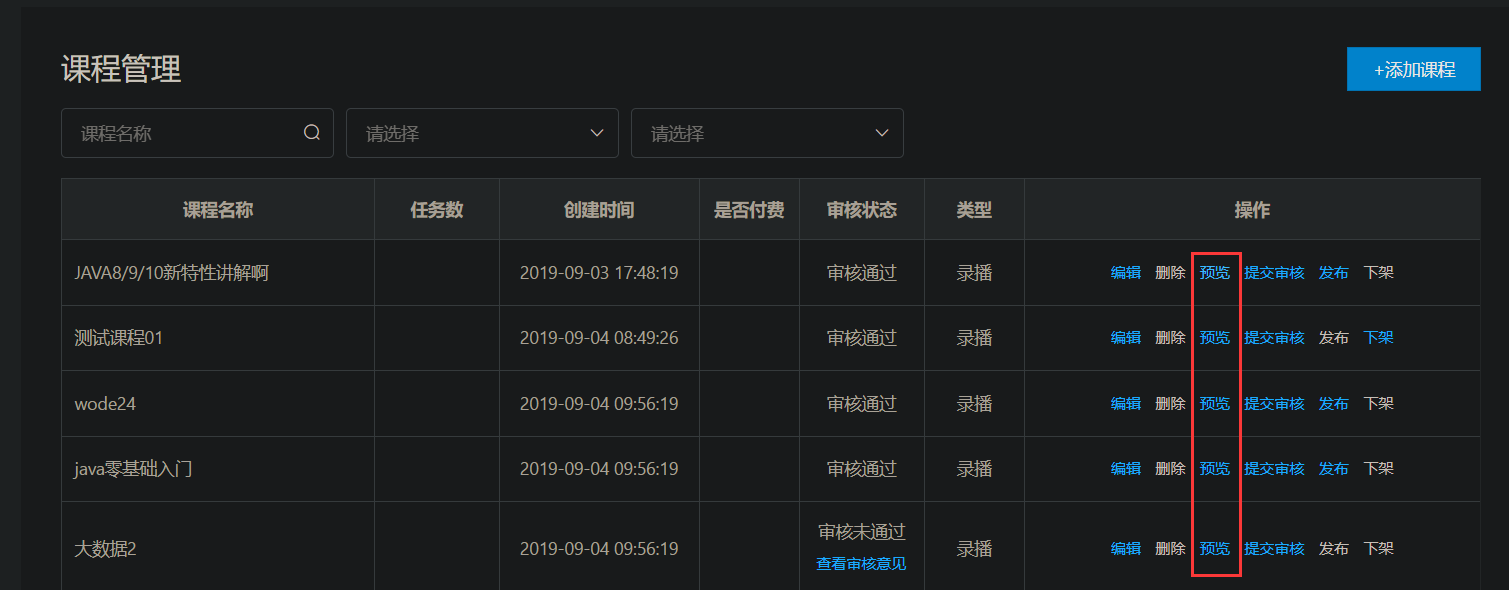
- 教学机构用户在课程管理中可对该机构所管理的课程进行检索
- 点击某课程数据后的预览链接,即可对该课程进行预览,可以看到发布后的详情页面
- 点即课程目录中的具体章节,查看视频是否正常播放
视频审核
教学机构提交课程审核后,平台运营人员登录运营平台查询待审核的记录
具体审核的过程与课程预览的过程类似,运营人员查看课程信息、课程视频等内容
- 如果存在问题,则审核不通过,并附上审核不通过的原因供教学机构人员查看
- 如果课程内容没有违规信息且课程内容全面,则审核通过
- 课程审核通过后,教学机构发布课程成功
课程发布
- 教学机构用户在课程管理中可对机构内课程进行检索
- 点击某课程数据后的发布连接,即可对该课程进行发布
- 课程发布后可通过课程搜索查询到的课程信息,查看课程的详细信息
- 点击课程搜索页中课程列表的某个课程,可以进入课程详情页
课程预览
需求分析
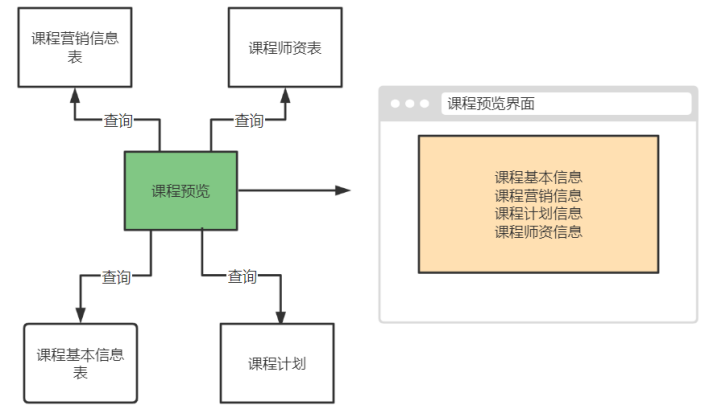
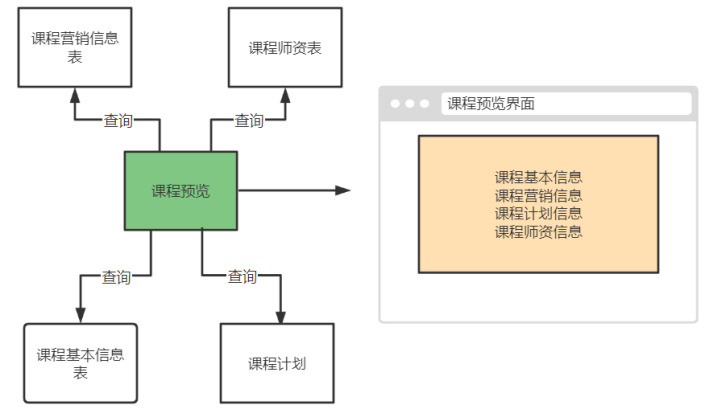
- 课程预览就是把课程的相关信息进行整合,在课程详情界面进行展示,通过课程预览页面查看信息是否存在问题
- 下图是课程预览的数据来源
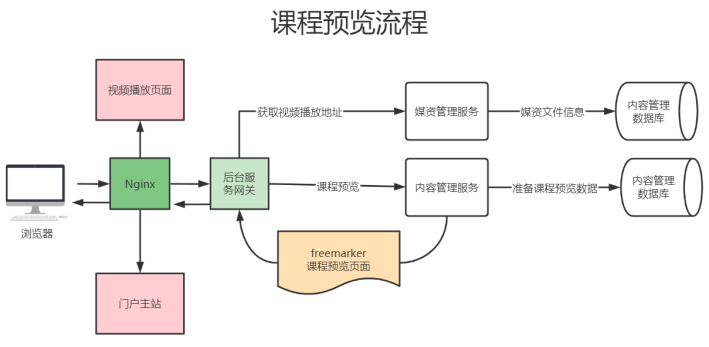
课程预览的效果与最终课程发布后查看到的效果是一致的,所以课程预览时会通过网站门户域名地址进行预览,下图是课程预览的整个流程图
说明如下:
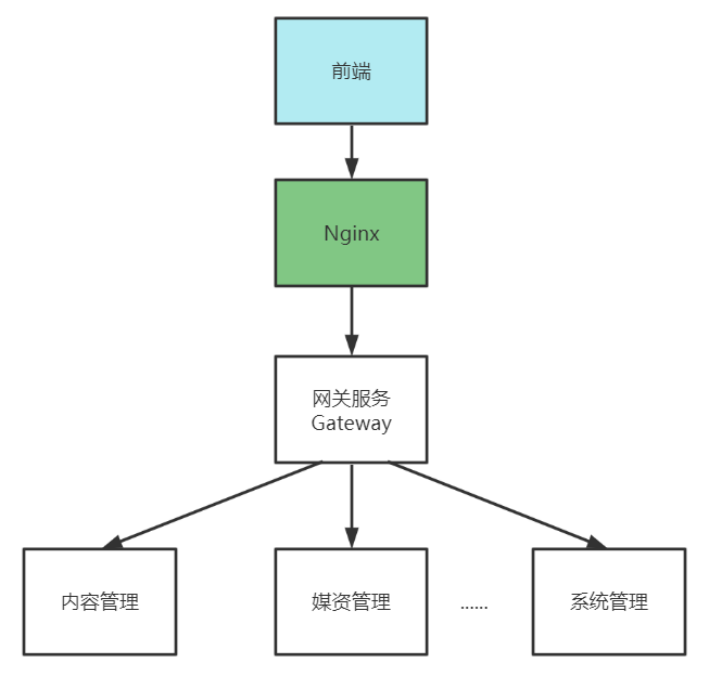
- 点击课程预览,通过Nginx、后台服务网关请求内容管理服务进行课程预览
- 内容管理服务查询课程相关信息进行整合,并通过模板引擎技术在服务端渲染生成页面,返回给浏览器
- 通过课程预览页面点击
马上学习打开视频播放页面 - 视频播放页面通过Nginx请求后台服务网关,查询课程信息展示课程计划目录,请求媒资管理查询课程计划绑定的视频文件的地址,在浏览器播放视频
模板引擎
什么是模板引擎
- 根据前面的数据模型分析,课程预览就是把课程的相关信息进行整合,在课程预览界面进行展示,课程预览界面与课程发布的课程详情界面一致,保证了教学机构人员发布前看到的是什么样,发布后也会看到什么样
- 项目采用模板引擎技术实现课程预览界面,那么什么是模板引擎?
- 早期我们使用的JSP技术就是一种模板引擎技术
- 浏览器请求web服务器
- 服务器渲染界面,渲染的过程就是向JSP界面(模板)内填充数据(模型)
- 服务器将渲染生成的页面返回给浏览器
所以模板引擎就是
模板 + 数据 = 输出。JSP页面就是模板,页面中嵌入的JSP标签就是数据,两者相结合输出HTML网页常用的Java模板引擎还有那些?
- JSP
- Freemarker
- Thymeleaf
- Velocity
- 本项目采用Freemarker作为模板引擎技术
- Freemarker官网:http://freemarker.foofun.cn/
Freemarker快速入门
- 下面在内容管理接口层搭建Freemarker的运行环境并测试
- 在content-api添加Freemarker与SpringBoot的整合包
1
2
3
4
5
<!-- Spring Boot 对结果视图 Freemarker 集成 -->
<dependency>
<groupId>org.springframework.boot</groupId>
<artifactId>spring-boot-starter-freemarker</artifactId>
</dependency> - nacos中配置freemarker,新增一个freemarker-config-dev.yaml配置
1
2
3
4
5
6
7
8
9
10
11
spring:
freemarker:
enabled: true
cache: false #关闭模板缓存,方便测试
settings:
template_update_delay: 0
suffix: .ftl #页面模板后缀名
charset: UTF-8
template-loader-path: classpath:/templates/ #页面模板位置(默认为 classpath:/templates/)
resources:
add-mappings: false #关闭项目中的静态资源映射(static、resources文件夹下的资源) - 在content-api的bootstrap.yml中添加freemarker的共享配置
1
2
3
4
5
6
7
8
9
10
shared-configs:
- data-id: swagger-${spring.profiles.active}.yaml
group: xuecheng-plus-common
refresh: true
- data-id: logging-${spring.profiles.active}.yaml
group: xuecheng-plus-common
refresh: true
+ - data-id: freemarker-config-${spring.profiles.active}.yaml
+ group: xuecheng-plus-common
+ refresh: true - 添加模板,在resource下创建templates目录(与配置文件中一致),添加test.ftl模板文件
1
2
3
4
5
6
7
8
9
10
<html>
<head>
<meta charset="utf-8">
<title>Hello World!</title>
</head>
<body>
Hello ${broski}!
</body>
</html> - 编写Controller方法,准备模型数据
1
2
3
4
5
6
7
8
9
10
11
public class FreemarkerController {
public ModelAndView test() {
ModelAndView modelAndView = new ModelAndView();
modelAndView.setViewName("test");
modelAndView.addObject("broski", "Kyle");
return modelAndView;
}
} - 启动内容管理服务,访问http://localhost:53040/content/testfreemaker ,屏幕输出
Hello Kyle!
- 在content-api添加Freemarker与SpringBoot的整合包
测试静态页面
部署网站门户
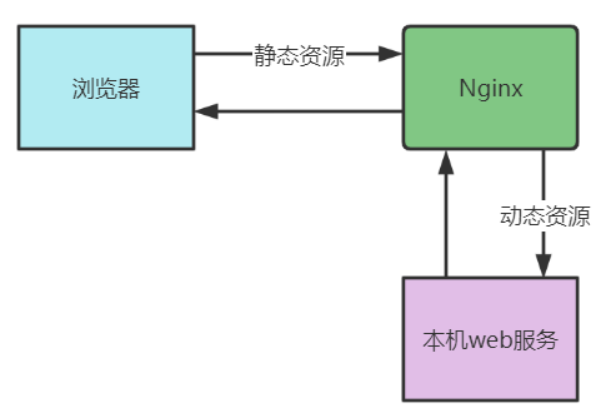
- 在课程预览界面上要加载css、js、图片等内容,这里部署Nginx来访问这些静态资源,对于SpringBoot服务的动态资源由Nginx去代理请求
- 本机安装Nginx,直接用黑马提供的资料
- 运行nginx.exe,访问localhost,可以看到Nginx默认页面则启动成功(若失败,请检查是否存在中文目录或者端口占用情况)
- 解压黑马提供的xc-ui-pc-static-portal.zip文件,并记录解压的位置,在第5步修改Nginx配置时,需要指定其所在目录
- 在Nginx的conf/nginx.conf文件中配置如下内容
1
2
3
4
5
6
7
8
9
10
11
12
13
14
15
16
17
18
19
20
21
22
23
24
25
26
27
28
29
30
31
32
33
34
35
36
37
38
39
40
41
42
43
44
45
46
47
48
49
50
51
52
53
54
55
56
57
58
59
60
61
62
63
64
65
66
67
server {
listen 80;
server_name localhost;
#rewrite ^(.*) https://$server_name$1 permanent;
#charset koi8-r;
ssi on;
ssi_silent_errors on;
#access_log logs/host.access.log main;
location / {
alias D:\BaiduNetdiskDownload/xc-ui-pc-static-portal/;
index index.html index.htm;
}
#静态资源
location /static/img/ {
alias D:\BaiduNetdiskDownload/xc-ui-pc-static-portal/img/;
}
location /static/css/ {
alias D:\BaiduNetdiskDownload/xc-ui-pc-static-portal/css/;
}
location /static/js/ {
alias D:\BaiduNetdiskDownload/xc-ui-pc-static-portal/js/;
}
location /static/plugins/ {
alias D:\BaiduNetdiskDownload/xc-ui-pc-static-portal/plugins/;
add_header Access-Control-Allow-Origin http://ucenter.localhost;
add_header Access-Control-Allow-Credentials true;
add_header Access-Control-Allow-Methods GET;
}
location /plugins/ {
alias D:\BaiduNetdiskDownload/xc-ui-pc-static-portal/plugins/;
}
#error_page 404 /404.html;
## redirect server error pages to the static page /50x.html
#
error_page 500 502 503 504 /50x.html;
location = /50x.html {
root html;
}
## proxy the PHP scripts to Apache listening on 127.0.0.1:80
#
#location ~ \.php$ {
## proxy_pass http://127.0.0.1;
#}
## pass the PHP scripts to FastCGI server listening on 127.0.0.1:9000
#
#location ~ \.php$ {
## root html;
## fastcgi_pass 127.0.0.1:9000;
## fastcgi_index index.php;
## fastcgi_param SCRIPT_FILENAME /scripts$fastcgi_script_name;
## include fastcgi_params;
#}
## deny access to .htaccess files, if Apache's document root
## concurs with nginx's one
#
#location ~ /\.ht {
## deny all;
#}
} - 启动Nginx,访问localhost,可以看到学成在线的门户网站(我这里就没配域名了,会被定向到涩情网站)
课程详情页面
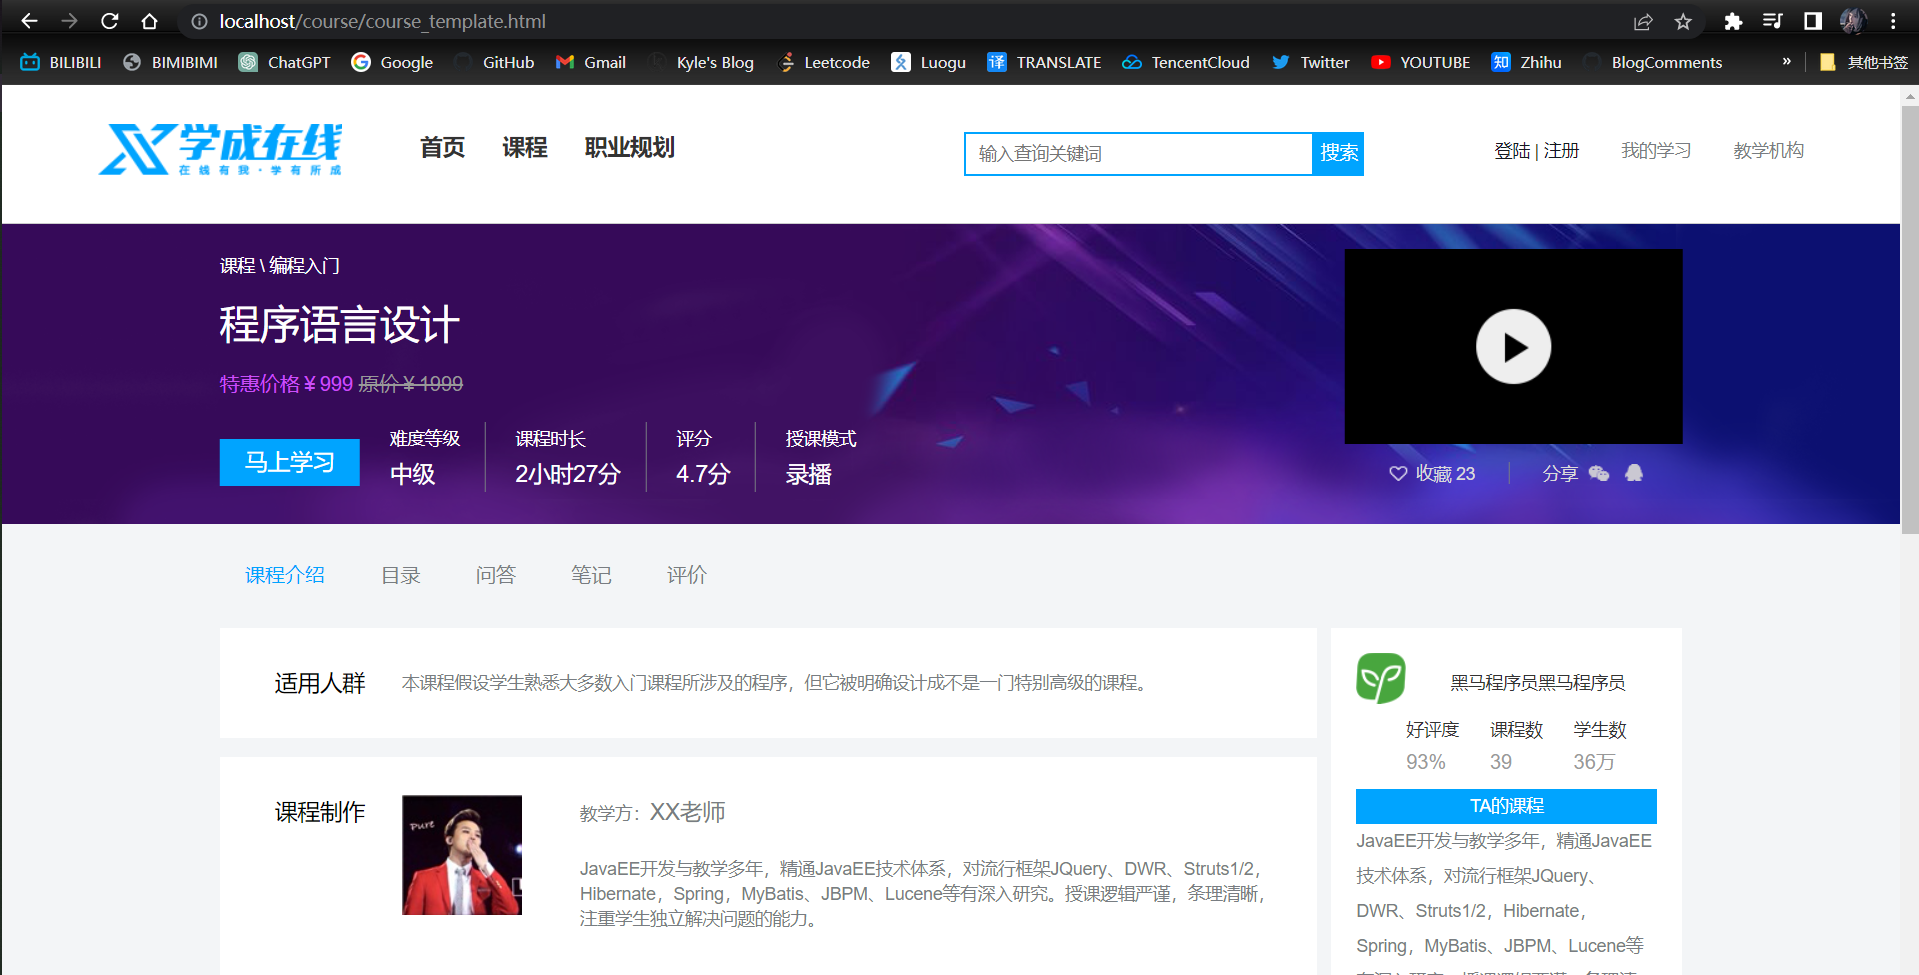
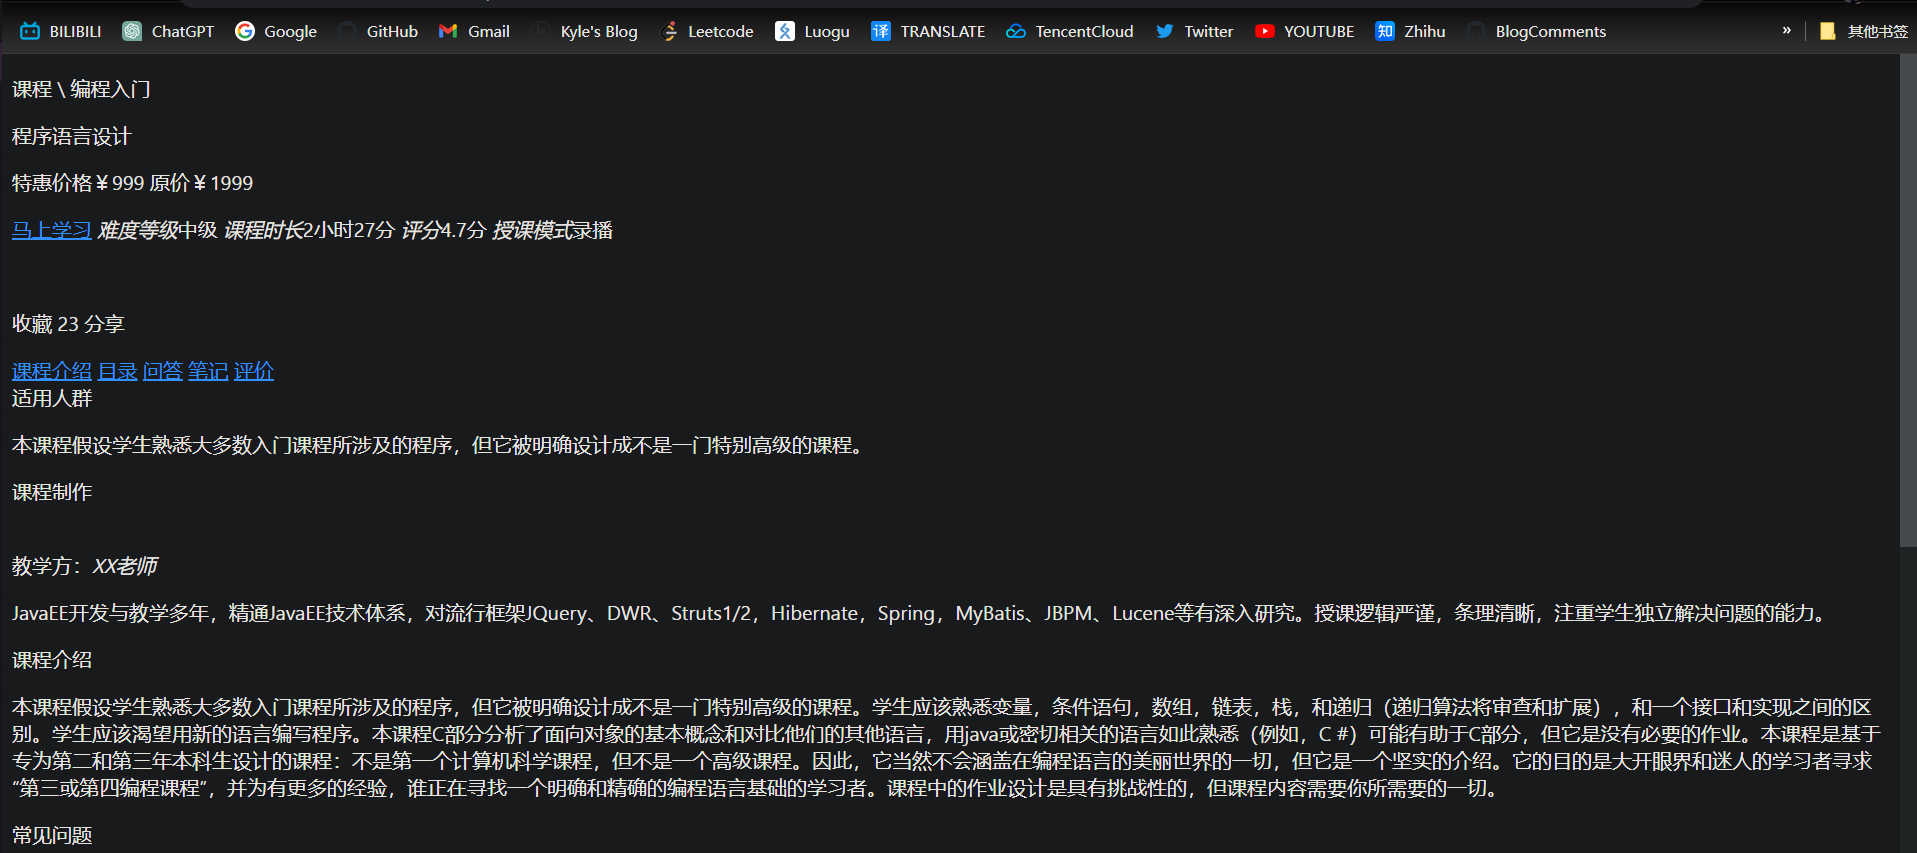
- course_template.html是一个静态html页面,里面还没有添加freemarker标签,如果要预览该页面需要借助Nginx进行预览,因为页面需要加载一些css样式表、图片等内容
- course_template.html文件在xc-ui-pc-static-portal\course目录下
- 通过浏览器访问localhost/course/course_template.html,效果如下
文件服务器
- 在进行课程预览时,需要展示课程的图片,在线播放课程视频、课程图片,而这些媒资都在MinIO文件系统存储,下面统一由Nginx代理,通过文件服务域名统一访问
- 在nginx.conf中配置文件服务器的代理地址
1
2
3
4
5
6
7
8
9
10
11
12
13
14
15
16
17
18
19
#文件服务
upstream fileserver{
server localhost:9000 weight=10;
}
server {
listen 80;
server_name file.localhost;
#charset koi8-r;
ssi on;
ssi_silent_errors on;
#access_log logs/host.access.log main;
location /video {
proxy_pass http://fileserver;
}
location /mediafiles {
proxy_pass http://fileserver;
}
} - 配置完毕,重新加载nginx配置
1
nginx.exe -s reload
- 通过http://file.localhost/video/视频地址 访问视频
- 通过http://file.localhost/mediafiles/图片地址 访问图片
视频播放页面
- 进入课程详情页面,点击马上学习或课程目录下的小节名称,打开视频播放页面
- 首先在nginx.conf中配置视频播放页面的地址
1
2
3
4
5
6
7
8
9
location /course/preview/learning.html {
alias D:\BaiduNetdiskDownload/xc-ui-pc-static-portal/course/learning.html;
}
location /course/search.html {
root D:\BaiduNetdiskDownload/xc-ui-pc-static-portal;
}
location /course/learning.html {
root D:\BaiduNetdiskDownload/xc-ui-pc-static-portal;
} - 修改learning.html,Ctrl + F搜索
videoObject,修改videoServer和video,同时将所有的www.xuecheng-plus.com替换成localhost,用VSCode可以快速全部替换1
2
3
4
5
6
7
8
9
10
11
12
13
14
15
16
17
18
19data: {
videServer:'http://file.localhost',
courseId:'',
teachplanId:'',
teachplans:[],
videoObject : {
container: '#vdplay', //容器的ID或className
variable: 'player',//播放函数名称
poster:'/static/img/asset-video.png',//封面图片
//loaded: 'loadedHandler', //当播放器加载后执行的函数
video:'http://file.localhost/video/a/9/a92da96ebcf28dfe194a1e2c393dd860/a92da96ebcf28dfe194a1e2c393dd860.mp4'
// video: [//视频地址列表形式
// ['http://file.xuecheng-plus.com/video/3/a/3a5a861d1c745d05166132c47b44f9e4/3a5a861d1c745d05166132c47b44f9e4.mp4', 'video/mp4', '中文标清', 0]
// ]
},
player : null,
preview:false
} - 修改course_template.html,同样将所有的
www.xuecheng-plus.com替换成localhost - 重启Nginx,访问
localhost/course/course_template.html,点击视频封面,会访问localhost/course/preview/learning.html?id=82,并且可以播放视频
接口定义
定义课程预览接口
- 课程预览接口要将课程信息进行整合,在服务端渲染页面后返回浏览器
- 下面对课程预览接口进行分析
- 请求参数:传入课程id,表示要预览哪一门课程
- 响应结果:输出课程详情页面到浏览器
- 响应页面到浏览器使用freemarker模板引擎技术实现,首先从黑马提供的资料中获取课程预览界面
course_template.html,拷贝至content-api打的resources/template目录下,复制一份并重命名为course_template.ftl - 下面定义接口
1
2
3
4
5
6
7
8
9
10
11
public class CoursePublishController {
public ModelAndView preview( Long courseId){
ModelAndView modelAndView = new ModelAndView();
modelAndView.setViewName("course_template");
modelAndView.addObject("model", null);
return modelAndView;
}
} - 重启ContentApiApplication,现在当我们点击预览按钮时,会打开预览页面,但是此时页面内容没有样式,稍后我们来解决这个问题
配置反向代理
- 课程预览接口虽然可以正常访问,但是页面没有样式,我们需要由Nginx反向代理访问课程预览接口
1
2
3
4
5
6
7
8
9
10
11
12
13
14
upstream gatewayserver{
server 127.0.0.1:53010 weight=10;
}
server {
listen 80;
server_name localhost;
....
location /api/ {
proxy_pass http://gatewayserver/;
}
····
} - 重新加载Nginx配置文件
1
nginx.exe -s reload
- 访问新地址
localhost/api/content/coursepreview/1页面样式正常,但是现在的内容是静态内容,写死的,我们需要调用Service方法获取模型数据,并进行页面渲染
接口开发
数据模型
- 课程预览就是把课程基本信息、营销信息、课程计划、师资信息等课程的相关信息进行整合,在预览页面进行展示,如下图
- 在使用freemarker渲染生成视图时,需要数据模型,此数据模型包括基本信息、营销信息、课程计划、师资信息等信息,所以我们这里需要定义一个数据模型类
1
2
3
4
5
6
7
8
9
10
11
12
13
14
15
16
17
18
public class CoursePreviewDto {
/**
* 课程基本计划、课程营销信息
*/
CourseBaseInfoDto courseBaseInfoDto;
/**
* 课程计划信息
*/
List<TeachplanDto> teachplans;
/**
* 师资信息暂时不加
*/
}
Service接口
- Service负责从数据库查询基本信息、营销信息、课程计划等课程相关信息,组成CoursePreviewDto对象
1
2
3
4
5
6
7
8
9
10
11/**
* 课程预览、发布接口
*/
public interface CoursePublishService {
/**
* 根据课程id获取课程预览信息
* @param courseId 课程id
* @return package com.xuecheng.content.model.dto.CoursePreviewDto;
*/
CoursePreviewDto getCoursePreviewInfo(Long courseId);
} - 接口实现如下
1
2
3
4
5
6
7
8
9
10
11
12
13
14
15
16
17
18
19
20
21
public class CoursePublishServiceImpl implements CoursePublishService {
private CourseBaseInfoService courseBaseInfoService;
private TeachplanService teachplanService;
public CoursePreviewDto getCoursePreviewInfo(Long courseId) {
CoursePreviewDto coursePreviewDto = new CoursePreviewDto();
// 根据课程id查询 课程基本信息、营销信息
CourseBaseInfoDto courseBaseInfo = courseBaseInfoService.getCourseBaseInfo(courseId);
// 根据课程id,查询课程计划
List<TeachplanDto> teachplanDtos = teachplanService.findTeachplanTree(courseId);
// 封装返回
coursePreviewDto.setCourseBaseInfoDto(courseBaseInfo);
coursePreviewDto.setTeachplans(teachplanDtos);
return coursePreviewDto;
}
}
接口层完善
- 接口层调用Service方法,获取模板引擎所需要的模型数据
1
2
3
4
5
6
7
8
9
10
11
12
13
14
15
public class CoursePublishController {
private CoursePublishService coursePublishService;
public ModelAndView preview( Long courseId){
CoursePreviewDto coursePreviewInfo = coursePublishService.getCoursePreviewInfo(courseId);
ModelAndView modelAndView = new ModelAndView();
modelAndView.setViewName("course_template");
modelAndView.addObject("model", coursePreviewInfo);
return modelAndView;
}
}
前后端联调
- 目前是通过Nginx访问门户,Nginx是整个项目最前方的代理服务器,如下
- 原来前端直接指向后台网关地址,现在要改为Nginx的地址,修改前段
.env文件1
VUE_APP_SERVER_API_URL=http://localhost/api
- 重启前端工程,进入课程列表点击预览按钮,正常打开课程预览页面
编写模板
- 模型数据准备好后,下一步就是将模型数据填充到
course_template.ftl上 - 填充时注意不要一次填充太多,边填边测,利于发现问题
- freemarker提供了很多指令用于解析各种类型的数据模型,参考地址:http://freemarker.foofun.cn/ref_directives.html
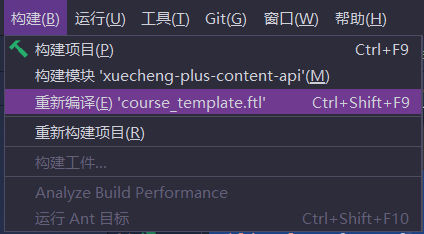
- 修改模板后需要编译
- 那么我们现在就用freemarker提供的指令,来替换掉页面中写死的数据
视频播放页面接口
- 在课程详情页面,点击课程小节的超链接,会进入视频播放页面,在此页面需要从后台获取课程计划作为目录、并根据课程计划获取对应的视频地址,现在我们就来编写这两个接口
- 获取课程计划接口:/open/content/course/whole/{courseId}
- 根据课程计划获取视频地址接口:/open/media/preview/{mediaId}
- 在nginx配置如下内容
1
2
3
4
5
6
7#openapi
location /open/content/ {
proxy_pass http://gatewayserver/content/open/;
}
location /open/media/ {
proxy_pass http://gatewayserver/media/open/;
} - 在content-api模块下的定义CourseOpenController类,并定义接口:获取课程计划接口:
/open/content/course/whole/{courseId}现在我们重启nginx和内容管理服务,访问视频播放页面,右侧已经可以成功显示目录了,如果没显示,访问1
2
3
4
5
6
7
8
9
10
11
12
13
public class CourseOpenController {
private CoursePublishService coursePublishService;
public CoursePreviewDto getPreviewInfo( Long courseId){
// 获取课程预览信息
return coursePublishService.getCoursePreviewInfo(courseId);
}
}http://localhost/open/content/course/whole/160查看是否能查询到数据 - 当我们点击右侧目录时,会自动跳转到对应的小节视频,所以我们来编写获取视频地址的接口,在media-api下定义MediaOpenController类,并定义接口
/open/media/preview/{courseId}那么到此为止,两个接口都开发完毕,我们点击右侧目录,可以正确的播放视频1
2
3
4
5
6
7
8
9
10
11
12
13
14
15
16
public class MediaOpenController {
private MediaFileService mediaFileService;
public RestResponse<String> getMediaUrl( String mediaId) {
MediaFiles mediaFile = mediaFileService.getFileById(mediaId);
if (mediaFile == null || StringUtils.isEmpty(mediaFile.getUrl())) {
XueChengPlusException.cast("视频还没有转码处理");
}
return RestResponse.success(mediaFile.getUrl());
}
}
面试
课程审核
需求分析
业务流程
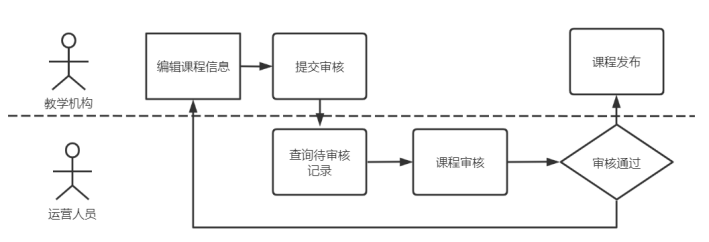
根据模块需求分析,课程发布前先要审核,审核通过方可发布。下图是课程审核及发布的流程图
为什么课程要审核通过才可以发布呢?
- 这样做为了防止课程信息有违规情况,课程信息不完善对网站用户体验也不好,课程审核不仅起到监督作用,也是帮助教学机构规范使用平台的手段。
- 如何控制课程审核通过才可以发布呢?
- 在课程基本表course_base中,设置课程审核状态字段,包括:未提交、已提交(未审核)、审核通过、审核不通过
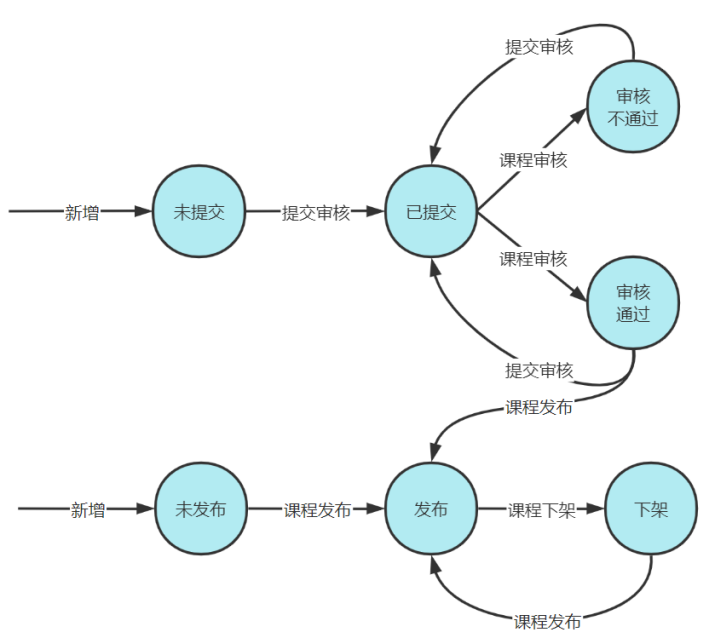
下面是课程状态的转换关系
说明如下
- 一门课程新增后,它的审核状态为
未提交,发布状态为未发布 - 课程信息编辑完成,教学机构人员进行
提交审核操作,此时课程的审核状态为已提交 - 当课程状态为
已提交时,运营平台人员对课程进行审核 - 运营平台人员审核课程,结果有两个:审核通过、审核不通过
- 课程审核后不管状态是否通过,教学机构都可以再次修改课程并提交审核,此时课程状态为
已提交,运营平台人员再次审核课程 - 课程审核通过,教学机构人员可以发布课程,发布成功后,课程的发布状态为
已发布 - 课程发布后,通过
下架操作可以更改课程发布状态为下架 - 课程下架后,通过
上架操作可以再次发布课程,上架后课程发布状态为发布
- 一门课程新增后,它的审核状态为
数据模型
- 通过业务流程分析,现在我们思考:课程提交审核后,还允许修改课程吗?
- 如果不允许修改是不合理的,因为提交很合后可以继续做下一个阶段的课程内容,比如添加课程计划、上传额外章节的课程视频等
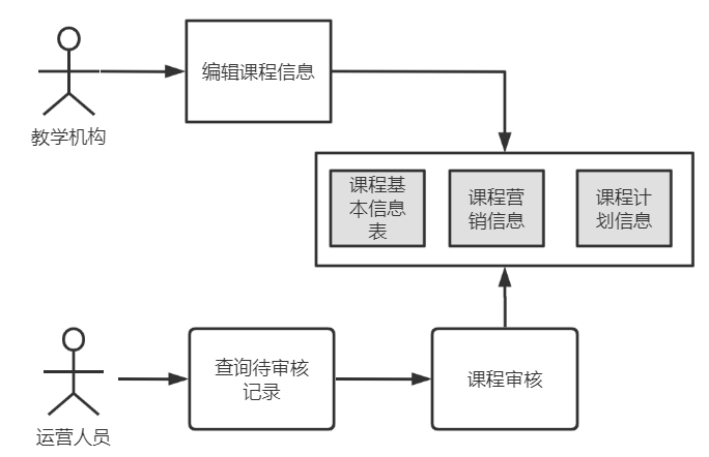
- 如果允许修改,那么课程审核时看到的课程内容从哪儿来呢?如果也从课程基本信息表、课程营销信息表、课程计划信息表中查询会出现什么问题呢?如下图
- 运营人员审核课程和教学机构编辑课程操作的数据是同一份,此时就可能产生冲突,例如:运营人员正在审核时,教学机构把数据修改了
- 为了解决这个问题,我们专门设计了一张课程与发布表
- 提交课程审核,将课程基本信息、营销信息、课程计划汇总后,写入该表中。
- 课程审核人员从预发布表查询信息
- 课程审核通过执行课程发布,将课程预发布的信息写入课程发布表
- 提交审核课程后,也修改了课程信息,可以再次提交审核吗?
- 这个问题在上面分析的课程审核状态时已经有了答案,如图
- 提交审核课程后,必须等待课程审核完毕后,才可以再次提交课程(无论审核通过/不通过)
- 这个问题在上面分析的课程审核状态时已经有了答案,如图
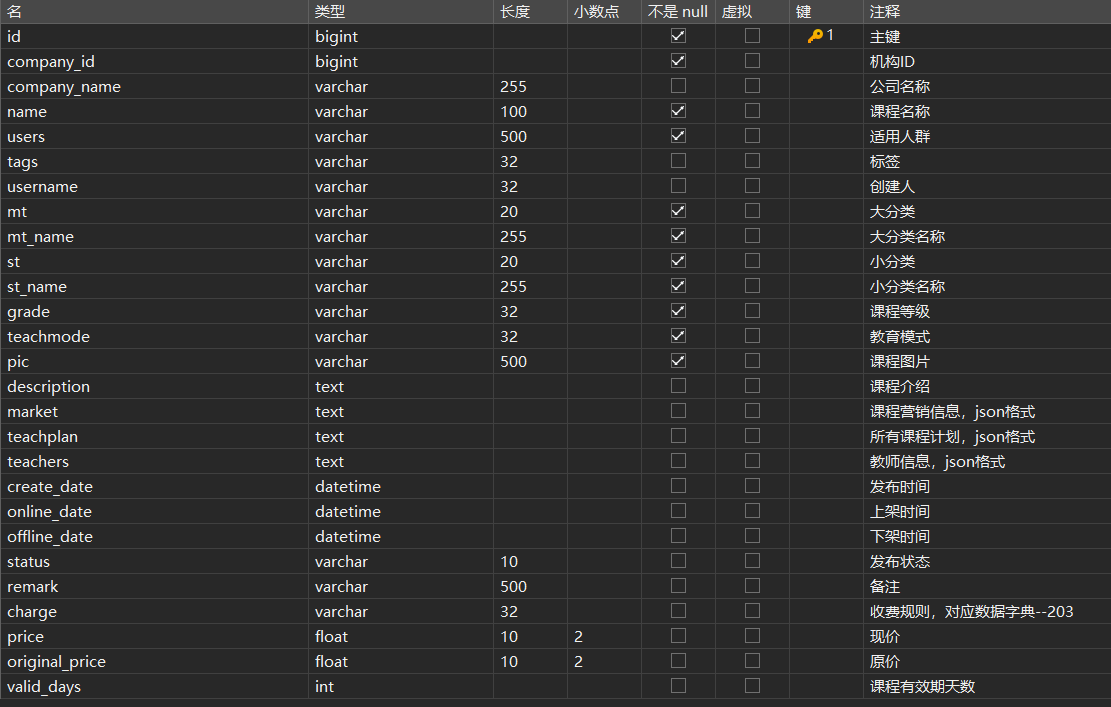
- 提交审核,将课程信息、课程计划信息等汇总,写入课程预发布表,表结构如下
- 提交审核的沟通过是,也需要将课程基本信息表的审核状态修改为:已经提交
- 课程审核后,更新课程基本信息表的审核状态、课程预发布表的审核状态,并将审核结果写入课程审核记录,其表结构如下
接口定义
- 当我们在课程管理页面点击
提交审核时,查看浏览器发出的请求1
2请求网址: http://localhost:8601/api/content/courseaudit/commit/1
请求方法: POST - 请求路径:/content/courseaudit/commit/{courseId}
- 请求方式:POST
- 从请求路径可以看出,该接口需要定义在content-api下
1
2
3
4
public void commitAudit( Long courseId) {
}
接口开发
DAO开发
- 使用自动生成的Mapper即可
- 通过上面的分析,我们要查询的内容如下
- 根据传入的courseId,查询课程基本信息、课程营销信息、课程计划信息,并汇总成课程预发布信息
- 向课程预发布表中插入我们汇总好的信息,如果已经存在,则更新,并状态为
已提交 - 更新课程基本信息表的审核状态为
已提交
- 约束
- 未提交或审核完后,方可提交审核
- 本机构只允许提交本机构的课程
- 没有上传图片,不允许提交审核
- 没有添加课程计划,不允许提交审核
Service开发
- 在课程发布Service类中定义接口如下
1
2
3
4
5/**
* 提交审核
* @param courseId 课程id
*/
void commitAudit(Long courseId); - 接口实现如下
1
2
3
4
5
6
7
8
9
10
11
12
13
14
15
16
17
18
19
20
21
22
23
24
25
26
27
28
29
30
31
32
33
34
35
36
37
38
39
40
41
42
43
44
45
46
47
48
49
50
public void commitAudit(Long companyId, Long courseId) {
// 查询课程基本信息
CourseBase courseBase = courseBaseMapper.selectById(courseId);
// 查询课程营销信息
CourseMarket courseMarket = courseMarketMapper.selectById(courseId);
// 查询课程基本信息、课程营销信息
CourseBaseInfoDto courseBaseInfo = courseBaseInfoService.getCourseBaseInfo(courseId);
// 查询课程计划
List<TeachplanDto> teachplanTree = teachplanService.findTeachplanTree(courseId);
// 1. 约束
String auditStatus = courseBaseInfo.getAuditStatus();
// 1.1 审核完后,方可提交审核
if ("202003".equals(auditStatus)) {
XueChengPlusException.cast("该课程现在属于待审核状态,审核完成后可再次提交");
}
// 1.2 本机构只允许提交本机构的课程
if (!companyId.equals(courseBaseInfo.getCompanyId())) {
XueChengPlusException.cast("本机构只允许提交本机构的课程");
}
// 1.3 没有上传图片,不允许提交
if (StringUtils.isEmpty(courseBaseInfo.getPic())) {
XueChengPlusException.cast("没有上传课程封面,不允许提交审核");
}
// 1.4 没有添加课程计划,不允许提交审核
if (teachplanTree.isEmpty()) {
XueChengPlusException.cast("没有添加课程计划,不允许提交审核");
}
// 2. 准备封装返回对象
CoursePublishPre coursePublishPre = new CoursePublishPre();
BeanUtils.copyProperties(courseBaseInfo, coursePublishPre);
coursePublishPre.setMarket(JSON.toJSONString(courseMarket));
coursePublishPre.setTeachplan(JSON.toJSONString(teachplanTree));
coursePublishPre.setCompanyId(companyId);
coursePublishPre.setCreateDate(LocalDateTime.now());
// 3. 设置预发布记录状态为已提交
coursePublishPre.setStatus("202003");
// 判断是否已经存在预发布记录,若存在,则更新
CoursePublishPre coursePublishPreUpdate = coursePublishPreMapper.selectById(courseId);
if (coursePublishPreUpdate == null) {
coursePublishPreMapper.insert(coursePublishPre);
} else {
coursePublishPreMapper.updateById(coursePublishPre);
}
// 4. 设置课程基本信息审核状态为已提交
courseBase.setAuditStatus("202003");
courseBaseMapper.updateById(courseBase);
}
接口完善
- 完善接口层代码,调用Service方法
1
2
3
4
5
public void commitAudit( Long courseId) {
Long companyId = 1232141425L;
coursePublishService.commitAudit(companyId, courseId);
}
接口测试
- 找一门信息补全的课程,测试4种约束条件
- 正常提交后,观察数据库中课程预发布表中的内容是否完整,不完整就打个断点调试一下,看看哪个数据少了
- 测试审核过后再次提交,提交后观察数据库中课程预发布表记录的内容是否正确
课程发布
需求分析
数据模型
- 教学机构人员在课程审核通过后,即可发布课程,课程发布后会公开展示在网站上供学生查看、选课、学习
- 在网喊上展示课程信息需要解决课程信息显示的性能问题,如果速度慢(排除网速原因)会影响用户的体验性
- 如何去快速搜索课程?打开课程详情页面仍然去查询数据库可行吗?
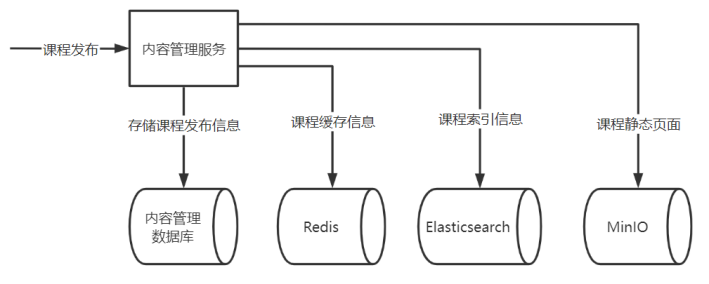
- 为了提高网站的速度需要将课程信息进行缓存,并且要将课程信息加入索引库方便搜索,下图显示了课程发布后课程信息的流转情况
- 向内容管理数据库的课程发布并存储课程发布信息
- 向Redis存储课程缓存信息
- 向Elasticsearch存储课程索引信息
- 请求分布式文件系统存储存储课程静态化页面(即htm页面),实现快速浏览课程详情页面
- 为了提高网站的速度需要将课程信息进行缓存,并且要将课程信息加入索引库方便搜索,下图显示了课程发布后课程信息的流转情况
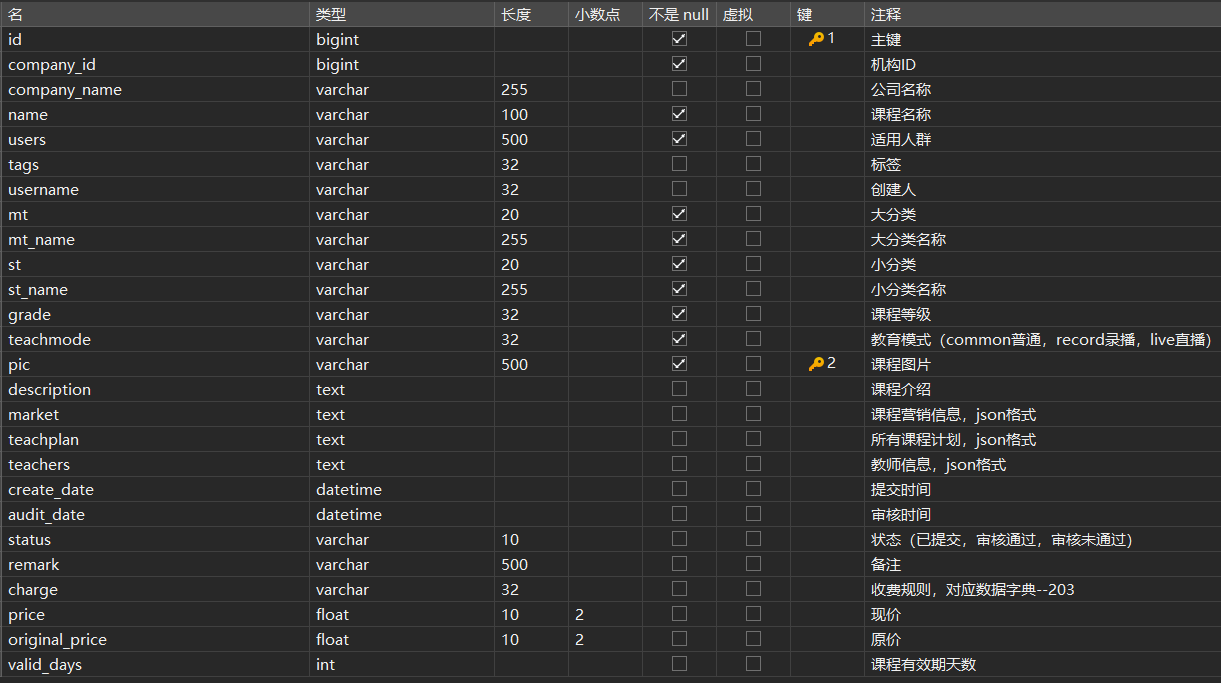
- 课程发布表的数据来源于课程预发布表,它们的结构基本一样
- Redis中的课程缓存信息是将课程发布表中的数据转为json进行存储
- ElasticSearch中的课程索引信息是根据搜索需要,将课程名称、课程介绍等字段创建倒排索引
- MinIO中存储了课程的静态化页面文件(html网页),查看课程详情是通过文件系统去浏览课程详情页面
分布式事务问题
什么是分布式事务
- 一次课程发布操作需要向数据库、Redis、Elasticsearch、MinIO写四份数据,这里存在分布式事务问题
什么是CAP理论
- 控制分布式事务首先需要理解CAP理论,什么是CAP理论?
- CAP理论是一个分布式系统设计的重要理论,它指出一个分布式系统最多只能同时满足一致性(Consistency)、可用性(Availability)和分区容忍性(Partition tolerance)这三项中的两项。
- 一致性是指所有节点访问同一份最新的数据副本
- 可用性是指每个请求都能得到响应
- 分区容忍性是指系统能够在网络分区的情况下继续运行。
- 下面使用分布式系统结构进行说明
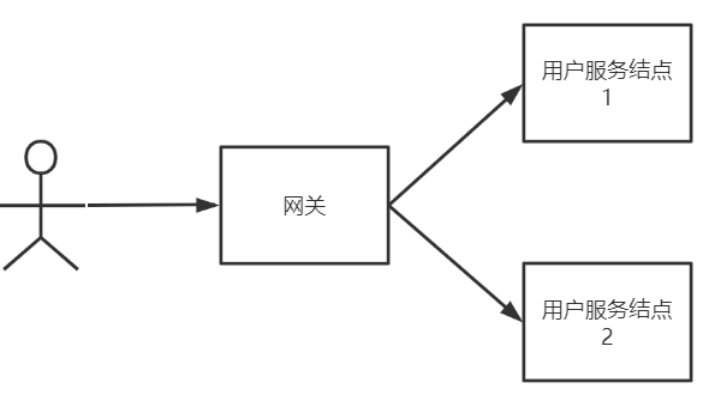
- 客户端经过网关访问用户服务的两个节点
- 一致性是指用户不管访问哪一个节点,拿到的数据都是最新的相同的,例如查询小明的信息,不能出现在数据没有改变的情况下,两次查询结果不一样
- 可用性是指任何时候查询用户信息都可以查询到结果,但是不保证查询到的是最新的数据
- 分区容忍性也叫分区容错性,由于网络通信异常,导致请求终端、消息丢失,单服务依然对外提供服务
- CAP理论要强调的是在分布式系统中,这三点不可能全部满足,因为只要是分布式系统就要满足分区容忍性,因为服务间难免会出现网络异常,不能因为局部网络异常就导致整个系统不可用
- 满足分区容忍性的条件下,一致性和可用性不能同时满足
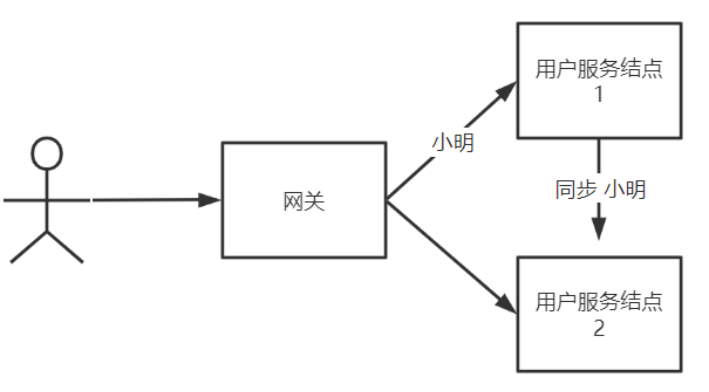
- 例如我们添加一个用户小明的信息,该信息先添加到结点1中,再同步到结点2中
- 如果满足C一致性,必须等待小明的信息同步完成后,系统才可用(否则当你查询结点2的时候,会查不到数据,违背了一致性)
- 如果满足A可用性,要时刻保证系统可用,就不用等待信息同步完成,此时系统的一致性就无法满足
- 所以C和A不能同时满足,在分布式系统中进行分布式事务控制,要么保证CP、要么保证AP
分布式事务控制方案
- 学习CAP理论,我们知道进行分布式事务控制要在C一致性和A可用性中做出取舍,保证一致性就不要保证可用性,保证可用性就不要保证一致性。
- 首先要确认我们的需求是要CP还是AP,具体要根据应用场景进行判断
- CP的场景:满足C舍弃A,强调一致性
- 跨行转账:一次转账请求要等待双方银行系统都完成整个事务才算完成,只要其中一个失败,另一方执行回滚操作
- 开户操作:在业务系统开户同时要在运营商开户,任何一方开户失败,该用户都不可使用新开账户,要满足一致性
- AP的场景:满足A舍弃C,强调可用性
- 订单退款,今日退款成功,明日账户到账,只要用户可以接受在一定时间内到账即可
- 注册送积分,注册成功,积分在24小时内到账
- 支付短信通信,支付成功发短信,短信发送可以有延迟
- 在实际应用中符合AP的场景比较多,虽然AP舍弃C的一致性,但实际最终数据还是保持了一致,所以业界定义了BASE理论
- BASE是Basically Available(基本可用)、Soft state(软状态)和 Eventually consistent (最终一致性)三个短语的缩写。
- 基本可用:当系统无法满足全部可用时,保证核心业务可用即可,比如一个外卖系统,到了饭点的时候系统并发量很高,此时要保证下单流程涉及的服务可用,其他服务暂不可用
- 软状态:可以存在中间状态,例如:微博的评论功能。当用户发表一条评论时,这条评论并不会立即同步到所有关注者的页面上,而是会先存储在缓存中,并逐渐传播到其他节点。这样就存在了一个中间状态,即某些用户可以看到这条评论,而某些用户还不能看到。
- 最终一致性:前面的软状态并不影响微博的整体可用性,用户仍然可以正常浏览和发表微博。最终,在一定时间内,所有关注者都能看到这条评论,达到了最终一致性。
课程发布分布式事务控制
- 前面的理论部分我们看完了,现在回到课程发布,执行课程发布操作后,需要向数据库、Redis、ElasticSearch、MinIO写四份数据,这个场景用哪种方案?
- 显然是AP,课程发布操作后,先更新数据库中的课程发布状态,更新后向Redis、ElasticSearch、MinIO写课程信息,只要在一定时间内最终成功写入数据即可
- 下图是具体的技术方案
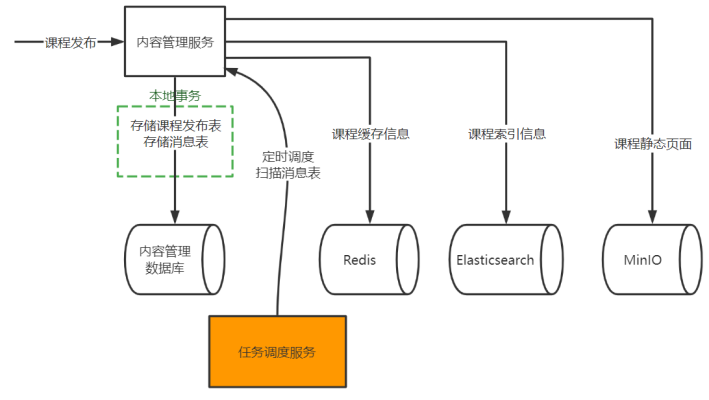
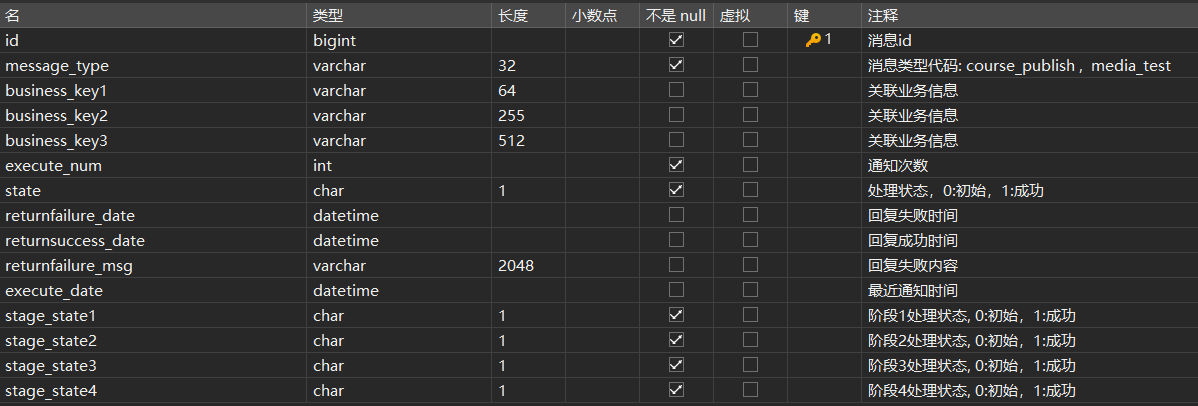
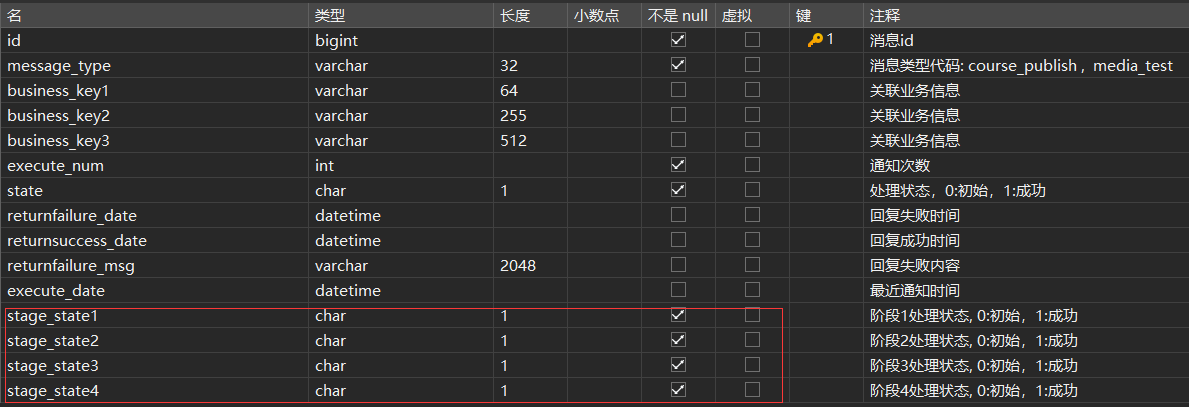
- 在内容管理服务的数据库添加一个消息表(mq_message),消息表和课程发布表在同一个数据库
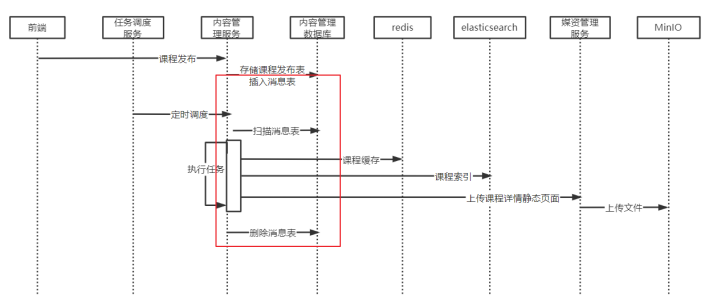
- 点击课程发布,通过本地事务向课程发布表写入课程发布信息,同时向消息表写入课程发布的信息,这两条记录需保证同时存在或者同时不存在
- 启动任务调度系统的定时调度,内容管理服务去定时扫描消息表的记录
- 当扫描到课程发布的消息时,即开始向Redis、ElasticSearch、MinIO完成同步数据的操作
- 同步数据的任务完成后删除消息表记录,并插入历史消息表
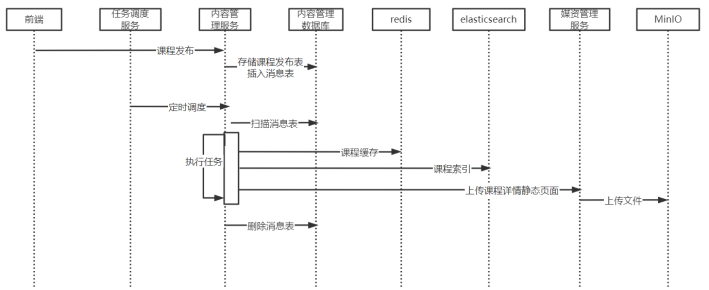
- 课程发布操作的时序图如下
- 执行发布操作,内容管理服务存储课程发布表的同时,向消息表插入一条
课程发布任务,这里使用本地事务保证课程发布信息保存成功,同时消息表也保存成功 - 任务调度服务定时调度内容管理服务扫描消息表,由于课程发布操作后向消息表插入了一条课程发布任务,所以此时会扫描到一条任务
- 拿到任务开始执行任务,分别向Redis、ElasticSearch、MinIO文件系统存储数据
- 任务完成后删除消息表记录
课程发布接口
接口定义
- 根据课程发布的分布式事务控制方案,课程发布操作首先通过本地事务向课程发布表写入课程发布信息,并向消息表插入一条记录,这里定义的课程发布接口要实现该功能
- 在课程管理界面点击随便找一门课程,点击
发布,查看浏览器发送的请求1
2请求网址: http://localhost:8601/api/content/coursepublish/1
请求方法: POST - 请求路径:/content/coursepublish/{courseId}
- 请求方式:POST
- 在content-api中定义接口
1
2
3
4
public void coursePublish( Long courseId) {
}
接口开发
## DAO开发
- 课程发布操作对数据库操作如下
- 向course_publish表中插入一条记录,如果存在则更新,发布状态为
已发布 - 更新course_base表的课程发布状态为
已发布 - 向mq_message表插入一条消息,消息类型为course_publish
- 删除课程预发布表的对应记录
- 向course_publish表中插入一条记录,如果存在则更新,发布状态为
- 约束
- 课程审核后通过,方可发布
- 本机构只允许发布本机构的课程
- 以上功能使用自动生成的Mapper接口即可完成
- mq_message表结构如下
## Service开发
- 定义Service接口
1
2
3
4
5
6/**
* 发布课程
* @param companyId
* @param courseId
*/
void publishCourse(Long companyId, Long courseId); - 对应的接口实现
1
2
3
4
5
6
7
8
9
10
11
12
13
14
15
16
17
18
19
20
21
22
23
24
25
26
27
28
29
30
31
32
33
34
35
36
37
38
39
40
41
42
43
44
45
46
47
48
49
50
51
52
53
54
55
56
57
58
59
public void publishCourse(Long companyId, Long courseId) {
// 1. 约束校验
// 1.1 获取课程预发布表数据
CoursePublishPre coursePublishPre = coursePublishPreMapper.selectById(courseId);
if (coursePublishPre == null) {
XueChengPlusException.cast("请先提交课程审核,审核通过后方可发布");
}
// 1.2 课程审核通过后,方可发布
if (!"202004".equals(coursePublishPre.getStatus())) {
XueChengPlusException.cast("操作失败,课程审核通过后方可发布");
}
// 1.3 本机构只允许发布本机构的课程
if (!coursePublishPre.getCompanyId().equals(companyId)) {
XueChengPlusException.cast("操作失败,本机构只允许发布本机构的课程");
}
// 2. 向课程发布表插入数据
saveCoursePublish(courseId);
// 3. 向消息表插入数据
saveCoursePublishMessage(courseId);
// 4. 删除课程预发布表对应记录
coursePublishPreMapper.deleteById(courseId);
}
/**
* 保存课程发布信息
* @param courseId 课程id
*/
private void saveCoursePublish(Long courseId) {
CoursePublishPre coursePublishPre = coursePublishPreMapper.selectById(courseId);
if (coursePublishPre == null) {
XueChengPlusException.cast("课程预发布数据为空");
}
CoursePublish coursePublish = new CoursePublish();
BeanUtils.copyProperties(coursePublishPre, coursePublish);
// 设置发布状态为已发布
coursePublish.setStatus("203002");
CoursePublish coursePublishUpdate = coursePublishMapper.selectById(courseId);
// 有则更新,无则新增
if (coursePublishUpdate == null) {
coursePublishMapper.insert(coursePublish);
} else {
coursePublishMapper.updateById(coursePublish);
}
// 更新课程基本信息表的发布状态为已发布
CourseBase courseBase = courseBaseMapper.selectById(courseId);
courseBase.setAuditStatus("203002");
courseBaseMapper.updateById(courseBase);
}
/**
* TODO 待会儿我们再来实现
* 保存消息表
* @param courseId 课程id
*/
private void saveCoursePublishMessage(Long courseId) {
}
## 接口完善
- 接口层调用Service方法
1
2
3
4
5
6
7
8
9
10/**
* 课程发布接口
*
* @param courseId 课程id
*/
public void coursePublish( Long courseId) {
Long companyId = 1232141425L;
coursePublishService.publishCourse(companyId, courseId);
}
接口测试
- 正常流程测试
- 提交审核课程
- 在数据库中手动修改课程的基本信息表和预发布信息表的审核状态为
审核通过 - 执行课程发布
- 观察课程发布表是否有数据,同时课程预发布表记录已经删除,课程基本信息表与课程发布表的发布状态为
发布
消息处理SDK
消息模块技术方案
- 课程发布操作执行后需要扫描消息表的记录,有关消息表处理的有哪些?
- 新增消息表
- 扫描消息表
- 更新消息表
- 删除消息表
- 使用消息表这种方式实现最终事务一致性的地方除了课程发布,还有其他业务场景
- 如果在每个地方都实现一套针对消息定时扫描、处理的逻辑,基本上都是重复的,软件的复用性太低、成本太高
- 如何解决这个问题?
- 我们可以将消息处理相关的逻辑做成一个通用的东西
- 那么是做成通用的服务还是做成通用的代码组件呢?
- 通用的服务是完成一个通用的独立功能,并提供独立的网络接口,比如:项目中的文件系统服务,提供文件的分布式存储服务
- 代码组件也是完成一个通用的独立功能,通常会提供API的方式供外部系统使用,例如:Fastjson、Apache commons工具包等
- 如果将消息处理做成一个通用的服务,该服务需要连接多个数据库,因为它要扫描微服务数据库下的消息表,并且还要提供微服务通信的网络接口,但就针对当前需求而言,开发成本有点高
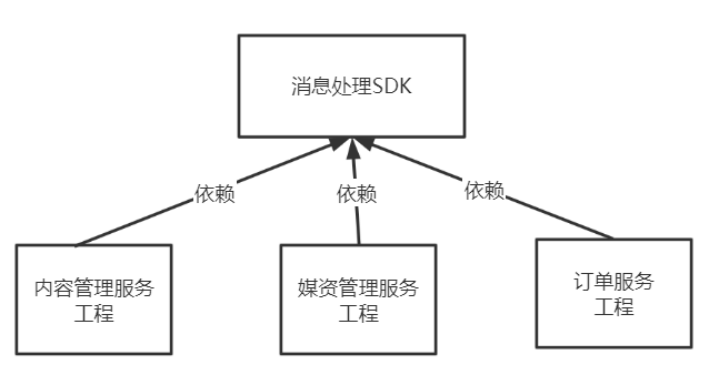
- 如果将消息处理做成一个SDK工具包,相比较通用服务,不仅可以解决将消息处理通用化的需求,还可以降低成本
- 所以本项目确定将对消息表相关的处理做成一个SDK组件,供各微服务使用,如下图
- 下面对消息SDK的设计内容进行说明:
- 综上所述,粗了消息表的增删改查接口外,消息SDK还具有如下接口功能
1
2
3
4
5
6
7
8
9
10
11
12
13
14
15
16
17
18
19
20
21
22
23
24
25
26
27
28
29
30
31
32
33
34
35
36
37
38
39
40
41
42
43
44
45
46
47
48
49
50
51
52
53
54public interface MqMessageService extends IService<MqMessage> {
/**
* 扫描消息表记录,采用与扫描视频处理表相同的思路
* @param shardIndex 分片序号
* @param shardTotal 分片总数
* @param count 扫描记录数
* @return java.util.List 消息记录
*/
List<MqMessage> getMessageList(int shardIndex, int shardTotal, String messageType, int count);
/**
* 添加消息
* @param businessKey1 业务id
* @param businessKey2 业务id
* @param businessKey3 业务id
* @return com.xuecheng.messagesdk.model.po.MqMessage 消息内容
*/
MqMessage addMessage(String messageType, String businessKey1, String businessKey2, String businessKey3);
/**
* 完成任务
* @param id 消息id
* @return int 更新成功:1
*/
int completed(long id);
/**
* 完成阶段任务
* @param id 消息id
* @return int 更新成功:1
*/
int completedStageOne(long id);
int completedStageTwo(long id);
int completedStageThree(long id);
int completedStageFour(long id);
/**
* 查询阶段状态
* @param id
* @return int
*/
int getStageOne(long id);
int getStageTwo(long id);
int getStageThree(long id);
int getStageFour(long id);
} - 消息SDK提供消息处理抽象类,此抽象类需由使用方去继承,如下
1
2
3
4
5
6
7
8
9
10
11
12
13
14
15
16
17
18
19
20
21
22
23
24
25
26
27
28
29
30
31
32
33
34
35
36
37
38
39
40
41
42
43
44
45
46
47
48
49
50
51
52
53
54
55
56
57
58
59
60
61
62
63
64
65
66
67
68
69
70
71
72
73
74
75
76
77
78
79/**
* 消息处理抽象类
*/
public abstract class MessageProcessAbstract {
MqMessageService mqMessageService;
/**
* 任务处理
* @param mqMessage 执行任务内容
* @return boolean true:处理成功,false处理失败
*/
public abstract boolean execute(MqMessage mqMessage);
/**
* 扫描消息表多线程执行任务
* @param shardIndex 分片序号
* @param shardTotal 分片总数
* @param messageType 消息类型
* @param count 一次取出任务总数
* @param timeout 预估任务执行时间,到此时间如果任务还没有结束则强制结束 单位秒
* @return void
*/
public void process(int shardIndex, int shardTotal, String messageType, int count, long timeout) {
try {
//扫描消息表获取任务清单
List<MqMessage> messageList = mqMessageService.getMessageList(shardIndex, shardTotal, messageType, count);
//任务个数
int size = messageList.size();
log.debug("取出待处理消息" + size + "条");
if (size <= 0) {
return;
}
//创建线程池
ExecutorService threadPool = Executors.newFixedThreadPool(size);
//计数器
CountDownLatch countDownLatch = new CountDownLatch(size);
messageList.forEach(message -> {
threadPool.execute(() -> {
log.debug("开始任务:{}", message);
//处理任务
try {
boolean result = execute(message);
if (result) {
log.debug("任务执行成功:{})", message);
//更新任务状态,删除消息表记录,添加到历史表
int completed = mqMessageService.completed(message.getId());
if (completed > 0) {
log.debug("任务执行成功:{}", message);
} else {
log.debug("任务执行失败:{}", message);
}
}
} catch (Exception e) {
e.printStackTrace();
log.debug("任务出现异常:{},任务:{}", e.getMessage(), message);
}
//计数
countDownLatch.countDown();
log.debug("结束任务:{}", message);
});
});
//等待,给一个充裕的超时时间,防止无限等待,到达超时时间还没有处理完成则结束任务
countDownLatch.await(timeout, TimeUnit.SECONDS);
System.out.println("结束....");
} catch (InterruptedException e) {
e.printStackTrace();
}
}
}
消息模块SDK测试
- 在内容管理数据库创建消息表和消息历史表,
- 拷贝黑马提供的消息处理SDK到项目根目录
- 下面测试消息SDK接口
- 继承消息处理抽象类
MessageProcessAbstract,编写任务执行方法1
2
3
4
5
6
7
8
9
10
11
12
13
14
15
16
17
18
19
20
21
22
23
24
25
26
27
28
29
public class MessageProcessClass extends MessageProcessAbstract {
private ;
public boolean execute(MqMessage mqMessage) {
// 1. 从获取任务id
Long id = mqMessage.getId();
log.debug("开始执行任务:{}", id);
// 2. 获取1阶段状态
MqMessageService mqMessageService = this.getMqMessageService();
int stageOne = mqMessageService.getStageOne(id);
if (stageOne == 0) {
log.debug("开始执行第一阶段的任务");
// TODO 第一阶段任务逻辑
// 一阶段任务完成,此方法的逻辑是将stageOne设置为1
int i = mqMessageService.completedStageOne(1);
if (i == 1) {
log.debug("完成一阶段任务");
}
} else {
log.debug("一阶段任务已经完成,无需再次执行");
}
return true;
}
} - 编写测试类
1
2
3
4
5
6
7
8
9
10
11
12
13
public class MessageProcessClassTest {
MessageProcessClass messageProcessClass;
public void test() {
System.out.println("开始执行-----》" + LocalDateTime.now());
messageProcessClass.process(0, 1, "test", 2, 10);
System.out.println("结束执行-----》" + LocalDateTime.now());
}
} - 准备测试数据
- 在消息表中插入一条消息类型为
test的信息,并执行测试方法,观察控制台输出
- 在消息表中插入一条消息类型为
- 继承消息处理抽象类
集成消息SDK
## 课程发布任务处理
- 下一步在课程发布模块去集成SDK完成课程发布任务处理,首先集成SDK并测试通过,然后再添加各任务的执行逻辑
- 在内容管理服务添加消息处理SDK的依赖,即可使用它,继承MessageProcessAbstract类,重写execute方法
- 在content-service工程中添加SDK依赖,同时也加上xxl-job的依赖
1
2
3
4
5
6
7
8
9<dependency>
<groupId>com.xuecheng</groupId>
<artifactId>xuecheng-plus-message-sdk</artifactId>
<version>0.0.1-SNAPSHOT</version>
</dependency>
<dependency>
<groupId>com.xuxueli</groupId>
<artifactId>xxl-job-core</artifactId>
</dependency> - 新建一个com.xuecheng.content.service.jobhandler包,编写CoursePublishTask类,使其继承MessageProcessAbstract类,重写其中的execute方法,这里先举一个简单的例子
1
2
3
4
5
6
7
8
9
10
11
12
13
14
15
16
17
18
19
20
21
22
public class CoursePublishTask extends MessageProcessAbstract {
private void coursePublishJobHandler() {
int shardIndex = XxlJobHelper.getShardIndex();
int shardTotal = XxlJobHelper.getShardTotal();
process(shardIndex, shardTotal, "course_publish", 5, 60);
log.debug("测试任务执行中...");
}
public boolean execute(MqMessage mqMessage) {
log.debug("开始执行课程发布任务,课程id:{}", mqMessage.getBusinessKey1());
// TODO 将课程信息静态页面上传至MinIO
// TODO 存储到Redis
// TODO 存储到ElasticSearch
return true;
}
} - 在nacos中为
content-service-dev.yaml配置xxl-job的连接信息1
2
3
4
5
6
7
8
9
10
11
12xxl:
job:
admin:
addresses: http://192.168.101.128:18088/xxl-job-admin/
executor:
appname: course-publish-job
address:
ip:
port: 10999
logpath: /data/applogs/xxl-job-jobhandler
logretentiondays: 30
accessToken: default_token - 在content-service中添加XxlJobConfig类,从media-service下复制即可
- 在xxl-job-admin控制台添加执行器
- AppName填写我们yml配置中的appname
- 重启服务,可以在xxl-job控制台看到我们注册的执行器
- 在xxl-job添加任务
- JobHandler中填写@XxlJob注解中的内容
- 启动任务测试,控制台可以看到
发布任务执行中...字样
- 在content-service工程中添加SDK依赖,同时也加上xxl-job的依赖
页面静态化
什么是页面静态化
- 根据课程发布的操作流程,执行课程发布后要将课程详情信息页面静态化,生成html页面上传至文件系统
静态化测试
- 下面使用Freemarker技术对页面静态化生成html页面
- 在content-service工程中添加Freemarker依赖
1
2
3
4<dependency>
<groupId>org.springframework.boot</groupId>
<artifactId>spring-boot-starter-freemarker</artifactId>
</dependency> - 编写测试方法,其实我也不会,但我会问chatGPT
1
2
3
4
5
6
7
8
9
10
11
12
13
14
15
16
17
18
19
20
21
22
23
24
25
26
27
28
public class FreemarkerTest {
CoursePublishService coursePublishService;
public void testGenerateHtmlByTemplate() throws IOException, TemplateException {
// 1. 创建一个FreeMarker配置:
Configuration configuration = new Configuration(Configuration.getVersion());
// 2. 告诉FreeMarker在哪里可以找到模板文件。
String classpath = this.getClass().getResource("/").getPath();
configuration.setDirectoryForTemplateLoading(new File(classpath + "/templates/"));
// 2.1 指定字符编码
configuration.setDefaultEncoding("utf-8");
// 3. 创建一个数据模型,与模板文件中的数据模型类型保持一致,这里是CoursePreviewDto类型
CoursePreviewDto coursePreviewDto = coursePublishService.getCoursePreviewInfo(2L);
HashMap<String, Object> map = new HashMap<>();
map.put("model", coursePreviewDto);
// 4. 加载模板文件
Template template = configuration.getTemplate("course_template.ftl");
// 5. 将数据模型应用于模板
String content = FreeMarkerTemplateUtils.processTemplateIntoString(template, map);
InputStream inputStream = IOUtils.toInputStream(content);
FileOutputStream fileOutputStream = new FileOutputStream("D:\\test.html");
IOUtils.copy(inputStream,fileOutputStream);
}
} - 执行测试方法,在D盘根目录可以看到生成的html页面,只不过现在没有css样式
上传文件测试
静态化生成文件后,需要上传至分布式文件系统,根据微服务的职责划分,媒资管理服务负责维护系统中的文件,所以内容管理服务对页面静态化生成的html文件需要调用媒资管理服务的上传文件接口
微服务之间存在远程调用,在SpringCloud中可以使用Feign进行远程调用
- 下面先准备Feign的开发环境,在content-service中添加依赖
1
2
3
4
5
6
7
8
9
10
11
12
13
14
15
16
17
18
19
20
21
22
23
24<dependency>
<groupId>com.alibaba.cloud</groupId>
<artifactId>spring-cloud-starter-alibaba-nacos-discovery</artifactId>
</dependency>
<!-- Spring Cloud 微服务远程调用 -->
<dependency>
<groupId>org.springframework.cloud</groupId>
<artifactId>spring-cloud-starter-openfeign</artifactId>
</dependency>
<dependency>
<groupId>io.github.openfeign</groupId>
<artifactId>feign-httpclient</artifactId>
</dependency>
<!--feign支持Multipart格式传参-->
<dependency>
<groupId>io.github.openfeign.form</groupId>
<artifactId>feign-form</artifactId>
<version>3.8.0</version>
</dependency>
<dependency>
<groupId>io.github.openfeign.form</groupId>
<artifactId>feign-form-spring</artifactId>
<version>3.8.0</version>
</dependency> - 在nacos配置feign-dev.yaml公用配置文件,group设置为xuecheng-plus-common
1
2
3
4
5
6
7
8
9
10
11
12
13
14feign:
client:
config:
default: ## default全局的配置
loggerLevel: BASIC ## 日志级别,BASIC就是基本的请求和响应信息
hystrix:
enabled: true
circuitbreaker:
enabled: true
httpclient:
enabled: true ## 开启feign对HttpClient的支持
max-connections: 200 ## 最大的连接数
max-connections-per-route: 50 ## 每个路径的最大连接数 - 在content-service和content-api的bootstrap中引入此配置文件
1
2
3- data-id: feign-${spring.profiles.active}.yaml
group: xuecheng-plus-common
refresh: true - 在content-service中配置feign支持Mulipart,编写MultipartSupportConfig类
1
2
3
4
5
6
7
8
9
10
11
12
13
14
15
16
17
18
19
20
21
22
23
24
25
26
27
28
29
30
31
32
33
34
35
36
37
38
39
40
41
42
43
44
45
46
47import feign.codec.Encoder;
import feign.form.spring.SpringFormEncoder;
import org.apache.commons.fileupload.FileItem;
import org.apache.commons.fileupload.disk.DiskFileItemFactory;
import org.apache.commons.io.IOUtils;
import org.springframework.beans.factory.ObjectFactory;
import org.springframework.beans.factory.annotation.Autowired;
import org.springframework.boot.autoconfigure.http.HttpMessageConverters;
import org.springframework.cloud.openfeign.support.SpringEncoder;
import org.springframework.context.annotation.Bean;
import org.springframework.context.annotation.Configuration;
import org.springframework.context.annotation.Primary;
import org.springframework.context.annotation.Scope;
import org.springframework.http.MediaType;
import org.springframework.web.multipart.MultipartFile;
import org.springframework.web.multipart.commons.CommonsMultipartFile;
import java.io.File;
import java.io.FileInputStream;
import java.io.OutputStream;
public class MultipartSupportConfig {
private ObjectFactory<HttpMessageConverters> messageConverters;
//注入相同类型的bean时优先使用
public Encoder feignEncoder() {
return new SpringFormEncoder(new SpringEncoder(messageConverters));
}
//将file转为Multipart
public static MultipartFile getMultipartFile(File file) {
FileItem item = new DiskFileItemFactory().createItem("file", MediaType.MULTIPART_FORM_DATA_VALUE, true, file.getName());
try (FileInputStream inputStream = new FileInputStream(file);
OutputStream outputStream = item.getOutputStream();) {
IOUtils.copy(inputStream, outputStream);
} catch (Exception e) {
e.printStackTrace();
}
return new CommonsMultipartFile(item);
}
} - 新建com.xuecheng.content.feignclient包,编写feign接口,其接口声明与
1
2
3
4
5
6
7
8
9
10/**
* 媒资管理服务远程调用接口
*/
public interface MediaServiceClient {
String upload( MultipartFile upload,
String folder,
String objectName);
} - 在启动类添加@EnableFeignClients注解
1
- 编写测试方法
1
2
3
4
5
6
7
8
9
10
11
12
13
14
15
16/**
* 测试使用feign远程上传文件
*/
public class FeignUploadTest {
MediaServiceClient mediaServiceClient;
//远程调用,上传文件
public void test() {
MultipartFile multipartFile = MultipartSupportConfig.getMultipartFile(new File("D:\\test.html"));
String result = mediaServiceClient.upload(multipartFile, "course", "test.html");
System.out.println(result);
}
} - 执行测试方法,上传文件成功,MinIO中也可以看到对应的文件,访问http://localhost:9000/mediafiles/course/test.html 也可以看到html页面
熔断降级处理
## 什么是熔断降级
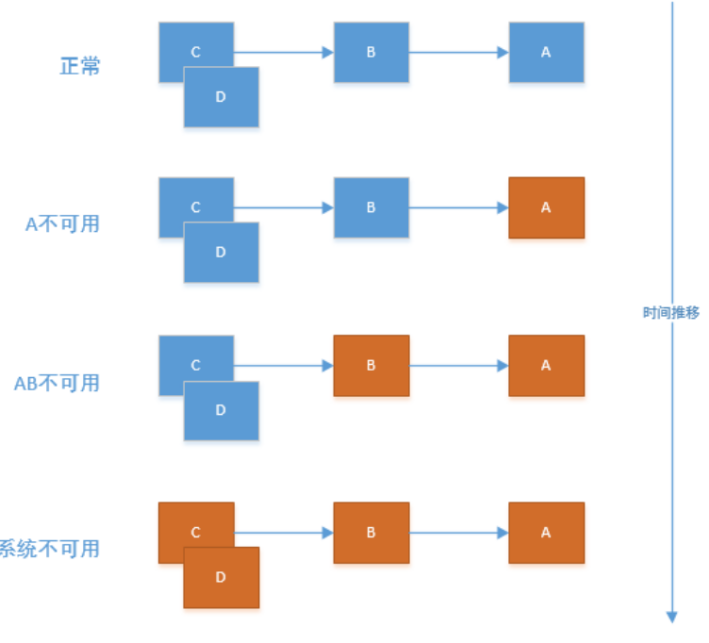
- 当微服务运行不正常,会导致无法正常调用微服务,此时会出现异常,如果这种异常不去处理,可能会导致雪崩效应
微服务的雪崩效应表现在服务与服务之间调用,当其中一个服务无法提供服务时,可能导致其他服务也挂掉。
- 例如服务C调用服务B,服务B调用服务A,由于服务A异常导致服务B响应缓慢,最终导致服务A和服务B都不可用,而服务B不可用又导致服务C也不可用。
- 像这样由一个服务所引起的一连串的服务都无法提供服务,就是微服务的雪崩效应
如何解决由于微服务异常所引起的雪崩效应呢?
- 可以采用熔断、降级的方法去解决
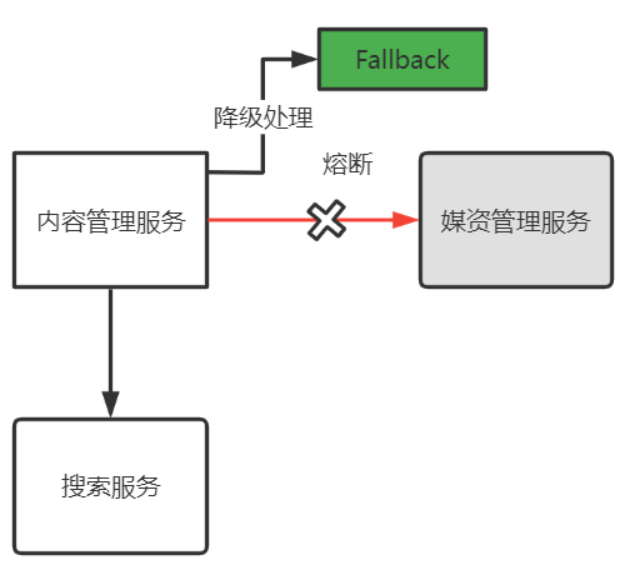
- 熔断降级的相同点都是为了解决微服务系统崩溃的问题,但它们是两个不同的技术手段,两者又存在联系
- 熔断:当下游服务异常时,断开与上游服务的交互。它就相当于保险丝,下游服务异常触发了熔断,从而保证上游服务不受影响
- 降级:当下游服务异常触发熔断后,上游服务就不再去调用异常的服务,而是执行降级处理逻辑,这个降级处理逻辑可以是本地的一个单独的方法
- 而这都是为了保护系统,熔断是当下服务异常时一种保护系统的手段,降级是熔断后上游服务处理熔断的方法
## 熔断降级处理
- 项目使用Hystrix框架实现熔断、降级处理
- 开启feign熔断保护
- 在feign-dev.yaml中配置
1
2
3
4
5feign:
hystrix:
enabled: true
circuitbreaker:
enabled: true
- 在feign-dev.yaml中配置
- 定义降级逻辑
- 方式一:fallback。定义一个fallback类MediaServiceClientFallback,此类实现了MediaServiceClient接口
1
2
3
4
5
6
7
8
9
10/**
* 媒资管理服务远程调用接口
*/
public interface MediaServiceClient {
String upload( MultipartFile upload,
String folder,
String objectName);
} - 定义的MediaServiceClientFallback类
1
2
3
4
5
6
7
8
9
public class MediaServiceClientFallback implements MediaServiceClient{
public String upload(MultipartFile upload, String folder, String objectName) {
log.debug("方式一:熔断处理,无法获取异常");
return null;
}
} - 方式二:fallbackFactory。由于方式一无法取出熔断所抛出的异常,而方式二定义MediaServiceClientFallbackFactory可以解决这个问题
1
2
3
4
5
6
7
8
9
10/**
* 媒资管理服务远程调用接口
*/
public interface MediaServiceClient {
String upload( MultipartFile upload,
String folder,
String objectName);
} - 定义的MediaServiceClientFallbackFactory类
1
2
3
4
5
6
7
8
9
10
11
12
13
14
public class MediaServiceClientFallbackFactory implements FallbackFactory<MediaServiceClient> {
public MediaServiceClient create(Throwable throwable) {
return new MediaServiceClient() {
public String upload(MultipartFile upload, String folder, String objectName) {
log.debug("方式二:熔断处理,熔断异常:{}", throwable.getMessage());
return null;
}
};
}
}
- 方式一:fallback。定义一个fallback类MediaServiceClientFallback,此类实现了MediaServiceClient接口
- 降级处理逻辑
- 返回一个null对象,上游服务请求接口得到一个null,说明执行了降级处理
- 开启feign熔断保护
课程静态化开发
- 课程页面静态化和静态页面远程上传测试通过,下一步开发课程静态化功能,最终是用消息SDK去调度执行
## 添加消息
- 课程发布操作使用本地事务保存课程发布消息、添加消息表,其中保存课程发布信息的方法我们前面已经写完了,现在来编写添加消息表
1
2
3
4
5
6
7
8
9
10
11
12
13
14
15// 注入消息SDK
private MqMessageService mqMessageService;
/**
* 保存消息表
*
* @param courseId 课程id
*/
private void saveCoursePublishMessage(Long courseId) {
MqMessage mqMessage = mqMessageService.addMessage("course_publish", String.valueOf(courseId), null, null);
if(mqMessage == null){
XueChengPlusException.cast("添加消息记录失败");
}
}
## 课程静态化实现
- 课程静态化包括两部分操作:生成课程静态化页面,上传静态化页面到MinIO文件系统
- 在课程发布的service编写这两部分内容,然后通过消息去调度执行
- 定义课程静态化接口和上传静态化页面接口
1
2
3
4
5
6
7
8
9
10
11
12
13/**
* 课程静态化
* @param courseId 课程id
* @return 静态化文件
*/
File generateCourseHtml(Long courseId);
/**
* 上传课程静态化页面
* @param courseId 课程id
* @param file 静态化文件
*/
void uploadCourseHtml(Long courseId, File file); - 接口实现
1
2
3
4
5
6
7
8
9
10
11
12
13
14
15
16
17
18
19
20
21
22
23
24
25
26
27
28
29
30
31
32
33
34
35
36
37
38
public File generateCourseHtml(Long courseId) {
File htmlFile = null;
try {
// 1. 创建一个Freemarker配置
Configuration configuration = new Configuration(Configuration.getVersion());
// 2. 告诉Freemarker在哪里可以找到模板文件
String classPath = this.getClass().getResource("/").getPath();
configuration.setDirectoryForTemplateLoading(new File(classPath + "/templates/"));
configuration.setDefaultEncoding("utf-8");
// 3. 创建一个模型数据,与模板文件中的数据模型保持一致,这里是CoursePreviewDto类型
CoursePreviewDto coursePreviewDto = this.getCoursePreviewInfo(courseId);
HashMap<String, Object> map = new HashMap<>();
map.put("model", coursePreviewDto);
// 4. 加载模板文件
Template template = configuration.getTemplate("course_template.ftl");
// 5. 将数据模型应用于模板
String content = FreeMarkerTemplateUtils.processTemplateIntoString(template, map);
// 5.1 将静态文件内容输出到文件中
InputStream inputStream = IOUtils.toInputStream(content);
htmlFile = File.createTempFile("course", ".html");
FileOutputStream fos = new FileOutputStream(htmlFile);
IOUtils.copy(inputStream, fos);
} catch (Exception e) {
log.debug("课程静态化失败:{}", e.getMessage());
e.printStackTrace();
}
return htmlFile;
}
public void uploadCourseHtml(Long courseId, File file) {
MultipartFile multipartFile = MultipartSupportConfig.getMultipartFile(file);
String course = mediaServiceClient.upload(multipartFile, "course", courseId + ".html");
if(course == null){
XueChengPlusException.cast("远程调用媒资服务上传文件失败");
}
} - 完善课程发布任务CoursePublishTask类的代码
1
2
3
4
5
6
7
8
9
10
11
12
13
14
15
16
17
18
19
20
21
22
23
24
25
26
27
28
29
30
31
32
33
34
35
36
37
38
39
40
41
42
43
44
45
46
47
48
49
50
51
public class CoursePublishTask extends MessageProcessAbstract {
private CoursePublishService coursePublishService;
private void coursePublishJobHandler() {
int shardIndex = XxlJobHelper.getShardIndex();
int shardTotal = XxlJobHelper.getShardTotal();
process(shardIndex, shardTotal, "course_publish", 5, 60);
}
public boolean execute(MqMessage mqMessage) {
log.debug("开始执行课程发布任务,课程id:{}", mqMessage.getBusinessKey1());
// TODO 一阶段:将课程信息静态页面上传至MinIO
String courseId = mqMessage.getBusinessKey1();
generateCourseHtml(mqMessage, Long.valueOf(courseId));
// TODO 二阶段:存储到Redis
// TODO 三阶段:存储到ElasticSearch
// 三阶段都成功,返回true
return true;
}
private void generateCourseHtml(MqMessage mqMessage, Long courseId) {
// 1. 幂等性判断
// 1.1 获取消息id
Long id = mqMessage.getId();
// 1.2 获取小任务阶段状态
MqMessageService mqMessageService = this.getMqMessageService();
int stageOne = mqMessageService.getStageOne(id);
// 1.3 判断小任务阶段是否完成
if (stageOne == 1) {
log.debug("当前阶段为静态化课程信息任务,已完成,无需再次处理,任务信息:{}", mqMessage);
return;
}
// 2. 生成静态页面
File file = coursePublishService.generateCourseHtml(Long.valueOf(courseId));
if (file == null) {
XueChengPlusException.cast("课程静态化异常");
}
// 3. 将静态页面上传至MinIO
coursePublishService.uploadCourseHtml(Long.valueOf(courseId), file);
// 4. 保存第一阶段状态
mqMessageService.completedStageOne(id);
}
}
- 定义课程静态化接口和上传静态化页面接口
## 测试
- 发布一门课程,启动xxl-job调度中心、启动课程发布任务,等待定时调度
- 观察控制台日志,观察任务是否可以正常处理
- 处理完进入文件系统,查看mediafiles桶内是否存在以课程id明明的html文件,并在浏览器打开访问
- 但是现在看不到样式,我们需要配置nginx
1
2
3location /course/ {
proxy_pass http://fileserver/mediafiles/course/;
} - 查看数据库中的mq_message_history表,是否有对应的课程id的数据,且一阶段的stage为1
面试
课程搜索
- 有关ElasticSearch的相关学习资料也在本站内有记录
需求分析
模块介绍
- 搜索功能是一个系统的重要功能,是消息查询的方式。课程搜索是课程展示的渠道
- 用户通过课程搜索找到课程信息,进一步去查看课程的详细信息,进行选课、支付、学习
- 本项目的课程搜索支持全文检索技术
- 全文检索可以简单理解为通过索引搜索文章
- 全文检索的速度非常快,早起应用在搜索引擎技术中,例如:百度、谷歌等。现在通常一些大型网站的搜索功能都是采用全文检索技术
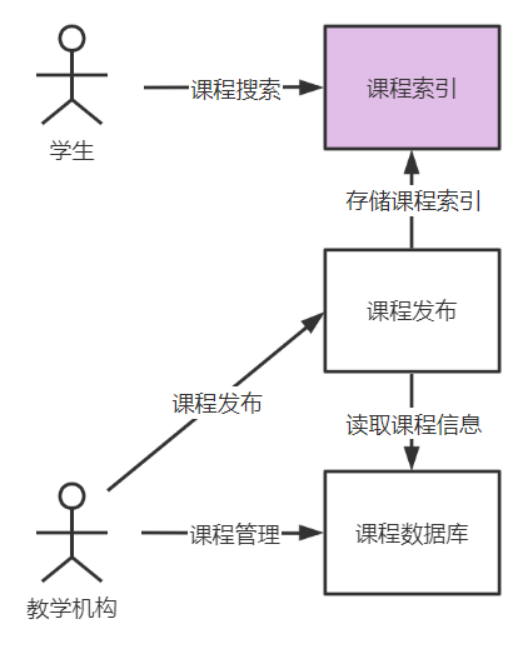
- 课程搜索也要将课程信息建立索引,在课程发布时建立课程索引,索引建立好,用户可通过搜索网页去查询课程信息
- 所以,课程搜索模块包括两部分
- 课程索引:将课程信息建立索引
- 课程搜索:通过前端网页,根据关键字等条件搜索课程
业务流程
- 根据模块介绍的内容,课程搜索模块包括课程索引、课程搜索两部分
- 课程索引:在课程发布操作执行后,通过消息处理方式创建课程索引,本项目使用ElasticSearch作为索引及搜索服务
- 课程搜索:课程索引创建完成,用户才可以通过前端搜索课程信息,课程搜索可以从首页进入搜索页面,并且可以通过课程分类、课程难度等级等条件进行搜索
准备环境
搭建ElasticSearch
详细的部署过程在文章中的1.4小节有详细叙述
拉取daocker镜像,这里采用的是ElasticSearch的7.12.1版本镜像
1
docker pull elasticsearch:7.12.1
- 运行docker命令,部署单点ES
1
2
3
4
5
6
7
8
9
10docker run -d \
--name es \
-e "ES_JAVA_OPTS=-Xms512m -Xmx512m" \
-e "discovery.type=single-node" \
-v es-data:/usr/share/elasticsearch/data \
-v es-plugins:/usr/share/elasticsearch/plugins \
--privileged \
--network es-net \
-p 9200:9200 \
elasticsearch:7.12.1 - 成功启动后,访问http://192.168.101.128:9200/ 可以看到ElasticSearch的响应结果
1
2
3
4
5
6
7
8
9
10
11
12
13
14
15
16
17{
"name" : "64d819e15a86",
"cluster_name" : "docker-cluster",
"cluster_uuid" : "S2S8sXLZTVSDjN25Qcq7KA",
"version" : {
"number" : "7.12.1",
"build_flavor" : "default",
"build_type" : "docker",
"build_hash" : "3186837139b9c6b6d23c3200870651f10d3343b7",
"build_date" : "2021-04-20T20:56:39.040728659Z",
"build_snapshot" : false,
"lucene_version" : "8.8.0",
"minimum_wire_compatibility_version" : "6.8.0",
"minimum_index_compatibility_version" : "6.0.0-beta1"
},
"tagline" : "You Know, for Search"
} - 拉取kibana的docker镜像,注意版本需与ElasticSearch的版本一致
1
docker pull kibana:7.12.1
- 运行docker命令,部署kibana
1
2
3
4
5
6docker run -d \
--name kibana \
-e ELASTICSEARCH_HOSTS=http://es:9200 \
--network=es-net \
-p 5601:5601 \
kibana:7.12.1 - 成功启动后,访问http://192.168.101.128:5601/ 可以看到kibana的初始页面
- 由于ElasticSearch的默认分词对中文的支持不太好,所以这里我们需要安装IK分词器
1
2
3
4
5
6
7
8
9
10## 进入容器内部
docker exec -it elasticsearch /bin/bash
## 在线下载并安装
./bin/elasticsearch-plugin install https://github.com/medcl/elasticsearch-analysis-ik/releases/download/v7.12.1/elasticsearch-analysis-ik-7.12.1.zip
#退出
exit
#重启容器
docker restart elasticsearch
创建索引
- 我们这里要创建course_publish,即课程发布表的索引,表结构如下
- 根据表中的字段创建索引,其中market、teachplan、teachers、onlineDate、offlineDate没有创建
1
2
3
4
5
6
7
8
9
10
11
12
13
14
15
16
17
18
19
20
21
22
23
24
25
26
27
28
29
30
31
32
33
34
35
36
37
38
39
40
41
42
43
44
45
46
47
48
49
50
51
52
53
54
55
56
57
58
59
60
61
62
63
64
65
66
67
68
69
70
71
72
73
74
75
76
77
78
79
80PUT /course-publish
{
"mappings": {
"properties": {
"id": {
"type": "keyword"
},
"companyId": {
"type": "keyword"
},
"companyName": {
"type": "text",
"search_analyzer": "ik_smart",
"analyzer": "ik_max_word"
},
"name": {
"type": "text",
"search_analyzer": "ik_smart",
"analyzer": "ik_max_word"
},
"users": {
"type": "text",
"search_analyzer": "ik_smart",
"analyzer": "ik_max_word"
},
"mt": {
"type": "keyword"
},
"mtName": {
"type": "keyword"
},
"st": {
"type": "keyword"
},
"stName": {
"type": "keyword"
},
"grade": {
"type": "keyword"
},
"teachmode": {
"type": "keyword"
},
"pic": {
"type": "text",
"index": false
},
"description": {
"type": "text",
"search_analyzer": "ik_smart",
"analyzer": "ik_max_word"
},
"createDate": {
"type": "date",
"format": "yyyy-MM-dd HH:mm:ss"
},
"status": {
"type": "keyword"
},
"remark": {
"type": "text",
"index": false
},
"charge": {
"type": "keyword"
},
"price": {
"type": "scaled_float",
"scaling_factor": 100
},
"originalPrice": {
"type": "scaled_float",
"scaling_factor": 100
},
"validDays": {
"type": "integer"
}
}
}
}
部署搜索工程
- 拷贝黑马提供的搜索工程到项目根目录
- 在nacos中新增配置文件
search-dev.yaml1
2
3
4
5
6
7
8
9
10server:
servlet:
context-path: /search
port: 53080
elasticsearch:
hostlist: 192.168.101.128:9200
course:
index: course-publish
source_fields: id,companyId,companyName,name,users,grade,mt,mtName,st,stName,charge,pic,price,originalPrice,description,teachmode,validDays,createDate - 修改bootstrap.yml中的配置信息为自己的
- 现在分析一下提供的代码中都有什么
- config包下只有一个ElasticSearchConfig,主要是提供了一个Java的客户端来操作ES的,将其注册为一个bean
1
2
3
4
5
6
7
8
9
10
11
12
13
14
15
16
17
18
19
20
21
public class ElasticsearchConfig {
// 1. 从nacos中读取es的地址,不过我这里只部署了单体ES,它这里可能是ES集群
private String hostlist;
public RestHighLevelClient restHighLevelClient() {
//2. 解析hostlist配置信息
String[] split = hostlist.split(",");
//3. 创建HttpHost数组,其中存放es主机和端口的配置信息
HttpHost[] httpHostArray = new HttpHost[split.length];
for (int i = 0; i < split.length; i++) {
String item = split[i];
httpHostArray[i] = new HttpHost(item.split(":")[0], Integer.parseInt(item.split(":")[1]), "http");
}
//4. 创建RestHighLevelClient客户端
return new RestHighLevelClient(RestClient.builder(httpHostArray));
}
} - 不过只部署一个节点的话,可以简化一下代码
1
2
3
4
5
6
7
8
9
10
11
public class ElasticsearchConfig {
private String hostlist;
public RestHighLevelClient restHighLevelClient() {
return new RestHighLevelClient(RestClient.builder(hostlist));
}
}
- 定义了两个Controller类
- 课程索引接口
- 该接口根据课程信息来创建索引
1
2
3
4
5
6
7
8
9
10
11
12
13
14
15
16
17
18
19
20
21
22
23
24
25
public class CourseIndexController {
private String courseIndexStore;
IndexService indexService;
public Boolean add( CourseIndex courseIndex) {
Long id = courseIndex.getId();
if (id == null) {
XueChengPlusException.cast("课程id为空");
}
Boolean result = indexService.addCourseIndex(courseIndexStore, String.valueOf(id), courseIndex);
if (!result) {
XueChengPlusException.cast("添加课程索引失败");
}
return true;
}
}
- 该接口根据课程信息来创建索引
- 课程搜索接口
1
2
3
4
5
6
7
8
9
10
11
12
13
14
15
16
17
public class CourseSearchController {
CourseSearchService courseSearchService;
public SearchPageResultDto<CourseIndex> list(PageParams pageParams, SearchCourseParamDto searchCourseParamDto) {
return courseSearchService.queryCoursePubIndex(pageParams, searchCourseParamDto);
}
}
- 课程索引接口
- 定义了两个dto类,一个是接收搜索课程参数的
1
2
3
4
5
6
7
8
9
10
11
12
13
14
15
public class SearchCourseParamDto {
//关键字
private String keywords;
//大分类
private String mt;
//小分类
private String st;
//难度等级
private String grade;
} - 另一个是网站门户显示的
1
2
3
4
5
6
7
8
9
10
11
12
13
14
public class SearchPageResultDto<T> extends PageResult {
//大分类列表
List<String> mtList;
//小分类列表
List<String> stList;
public SearchPageResultDto(List<T> items, long counts, long page, long pageSize) {
super(items, counts, page, pageSize);
}
}
- 定义了两个Service接口
- 课程索引Service,提供了三个接口,添加索引、更新索引、删除索引
1
2
3
4
5
6
7
8
9
10
11
12
13
14
15
16
17
18
19
20
21
22
23
24
25
26
27
28
29
30
31
32
33
34
35
36public interface IndexService {
/**
* @param indexName 索引名称
* @param id 主键
* @param object 索引对象
* @return Boolean true表示成功,false失败
* @description 添加索引
* @author Mr.M
* @date 2022/9/24 22:57
*/
Boolean addCourseIndex(String indexName, String id, Object object);
/**
* @param indexName 索引名称
* @param id 主键
* @param object 索引对象
* @return Boolean true表示成功,false失败
* @description 更新索引
* @author Mr.M
* @date 2022/9/25 7:49
*/
Boolean updateCourseIndex(String indexName, String id, Object object);
/**
* @param indexName 索引名称
* @param id 主键
* @return java.lang.Boolean
* @description 删除索引
* @author Mr.M
* @date 2022/9/25 9:27
*/
Boolean deleteCourseIndex(String indexName, String id);
} - 课程搜索Service
1
2
3
4
5
6
7
8
9
10
11public interface CourseSearchService {
/**
* @param pageParams 分页参数
* @param searchCourseParamDto 搜索条件
* @return com.xuecheng.base.model.PageResult<com.xuecheng.search.po.CourseIndex> 课程列表
* @description 搜索课程列表
* @author Mr.M
* @date 2022/9/24 22:45
*/
SearchPageResultDto<CourseIndex> queryCoursePubIndex(PageParams pageParams, SearchCourseParamDto searchCourseParamDto);
}
- 课程索引Service,提供了三个接口,添加索引、更新索引、删除索引
- 对应的两个实现类
- 课程索引接口实现
1
2
3
4
5
6
7
8
9
10
11
12
13
14
15
16
17
18
19
20
21
22
23
24
25
26
27
28
29
30
31
32
33
34
35
36
37
38
39
40
41
42
43
44
45
46
47
48
49
50
51
52
53
54
55
56
57
58
59
60
61
62
63
64
65
public class IndexServiceImpl implements IndexService {
RestHighLevelClient client;
public Boolean addCourseIndex(String indexName, String id, Object object) {
String jsonString = JSON.toJSONString(object);
IndexRequest indexRequest = new IndexRequest(indexName).id(id);
//指定索引文档内容
indexRequest.source(jsonString, XContentType.JSON);
//索引响应对象
IndexResponse indexResponse = null;
try {
indexResponse = client.index(indexRequest, RequestOptions.DEFAULT);
} catch (IOException e) {
log.error("添加索引出错:{}", e.getMessage());
e.printStackTrace();
XueChengPlusException.cast("添加索引出错");
}
String name = indexResponse.getResult().name();
System.out.println(name);
return name.equalsIgnoreCase("created") || name.equalsIgnoreCase("updated");
}
public Boolean updateCourseIndex(String indexName, String id, Object object) {
String jsonString = JSON.toJSONString(object);
UpdateRequest updateRequest = new UpdateRequest(indexName, id);
updateRequest.doc(jsonString, XContentType.JSON);
UpdateResponse updateResponse = null;
try {
updateResponse = client.update(updateRequest, RequestOptions.DEFAULT);
} catch (IOException e) {
log.error("更新索引出错:{}", e.getMessage());
e.printStackTrace();
XueChengPlusException.cast("更新索引出错");
}
DocWriteResponse.Result result = updateResponse.getResult();
return result.name().equalsIgnoreCase("updated");
}
public Boolean deleteCourseIndex(String indexName, String id) {
//删除索引请求对象
DeleteRequest deleteRequest = new DeleteRequest(indexName, id);
//响应对象
DeleteResponse deleteResponse = null;
try {
deleteResponse = client.delete(deleteRequest, RequestOptions.DEFAULT);
} catch (IOException e) {
log.error("删除索引出错:{}", e.getMessage());
e.printStackTrace();
XueChengPlusException.cast("删除索引出错");
}
//获取响应结果
DocWriteResponse.Result result = deleteResponse.getResult();
return result.name().equalsIgnoreCase("deleted");
}
} - 课程搜索接口实现
1
2
3
4
5
6
7
8
9
10
11
12
13
14
15
16
17
18
19
20
21
22
23
24
25
26
27
28
29
30
31
32
33
34
35
36
37
38
39
40
41
42
43
44
45
46
47
48
49
50
51
52
53
54
55
56
57
58
59
60
61
62
63
64
65
66
67
68
69
70
71
72
73
74
75
76
77
78
79
80
81
82
83
84
85
86
87
88
89
90
91
92
93
94
95
96
97
98
99
100
101
102
103
104
105
106
107
108
109
110
111
112
113
114
115
116
117
118
119
120
121
122
123
124
125
126
127
128
129
130
131
132
133
134
135
136
137
138
139
140
141
142
143
144
145
146
147
148
149
150
151
152
153
154
155
156
public class CourseSearchServiceImpl implements CourseSearchService {
private String courseIndexStore;
private String sourceFields;
RestHighLevelClient client;
public SearchPageResultDto<CourseIndex> queryCoursePubIndex(PageParams pageParams, SearchCourseParamDto courseSearchParam) {
//设置索引
SearchRequest searchRequest = new SearchRequest(courseIndexStore);
SearchSourceBuilder searchSourceBuilder = new SearchSourceBuilder();
BoolQueryBuilder boolQueryBuilder = QueryBuilders.boolQuery();
//source源字段过虑
String[] sourceFieldsArray = sourceFields.split(",");
searchSourceBuilder.fetchSource(sourceFieldsArray, new String[]{});
if (courseSearchParam == null) {
courseSearchParam = new SearchCourseParamDto();
}
//关键字
if (StringUtils.isNotEmpty(courseSearchParam.getKeywords())) {
//匹配关键字
MultiMatchQueryBuilder multiMatchQueryBuilder = QueryBuilders.multiMatchQuery(courseSearchParam.getKeywords(), "name", "description");
//设置匹配占比
multiMatchQueryBuilder.minimumShouldMatch("70%");
//提升另个字段的Boost值
multiMatchQueryBuilder.field("name", 10);
boolQueryBuilder.must(multiMatchQueryBuilder);
}
//过虑
if (StringUtils.isNotEmpty(courseSearchParam.getMt())) {
boolQueryBuilder.filter(QueryBuilders.termQuery("mtName", courseSearchParam.getMt()));
}
if (StringUtils.isNotEmpty(courseSearchParam.getSt())) {
boolQueryBuilder.filter(QueryBuilders.termQuery("stName", courseSearchParam.getSt()));
}
if (StringUtils.isNotEmpty(courseSearchParam.getGrade())) {
boolQueryBuilder.filter(QueryBuilders.termQuery("grade", courseSearchParam.getGrade()));
}
//分页
Long pageNo = pageParams.getPageNo();
Long pageSize = pageParams.getPageSize();
int start = (int) ((pageNo - 1) * pageSize);
searchSourceBuilder.from(start);
searchSourceBuilder.size(Math.toIntExact(pageSize));
//布尔查询
searchSourceBuilder.query(boolQueryBuilder);
//高亮设置
HighlightBuilder highlightBuilder = new HighlightBuilder();
highlightBuilder.preTags("<font class='eslight'>");
highlightBuilder.postTags("</font>");
//设置高亮字段
highlightBuilder.fields().add(new HighlightBuilder.Field("name"));
searchSourceBuilder.highlighter(highlightBuilder);
//请求搜索
searchRequest.source(searchSourceBuilder);
//聚合设置
buildAggregation(searchRequest);
SearchResponse searchResponse = null;
try {
searchResponse = client.search(searchRequest, RequestOptions.DEFAULT);
} catch (IOException e) {
e.printStackTrace();
log.error("课程搜索异常:{}", e.getMessage());
return new SearchPageResultDto<CourseIndex>(new ArrayList(), 0, 0, 0);
}
//结果集处理
SearchHits hits = searchResponse.getHits();
SearchHit[] searchHits = hits.getHits();
//记录总数
TotalHits totalHits = hits.getTotalHits();
//数据列表
List<CourseIndex> list = new ArrayList<>();
for (SearchHit hit : searchHits) {
String sourceAsString = hit.getSourceAsString();
CourseIndex courseIndex = JSON.parseObject(sourceAsString, CourseIndex.class);
//取出source
Map<String, Object> sourceAsMap = hit.getSourceAsMap();
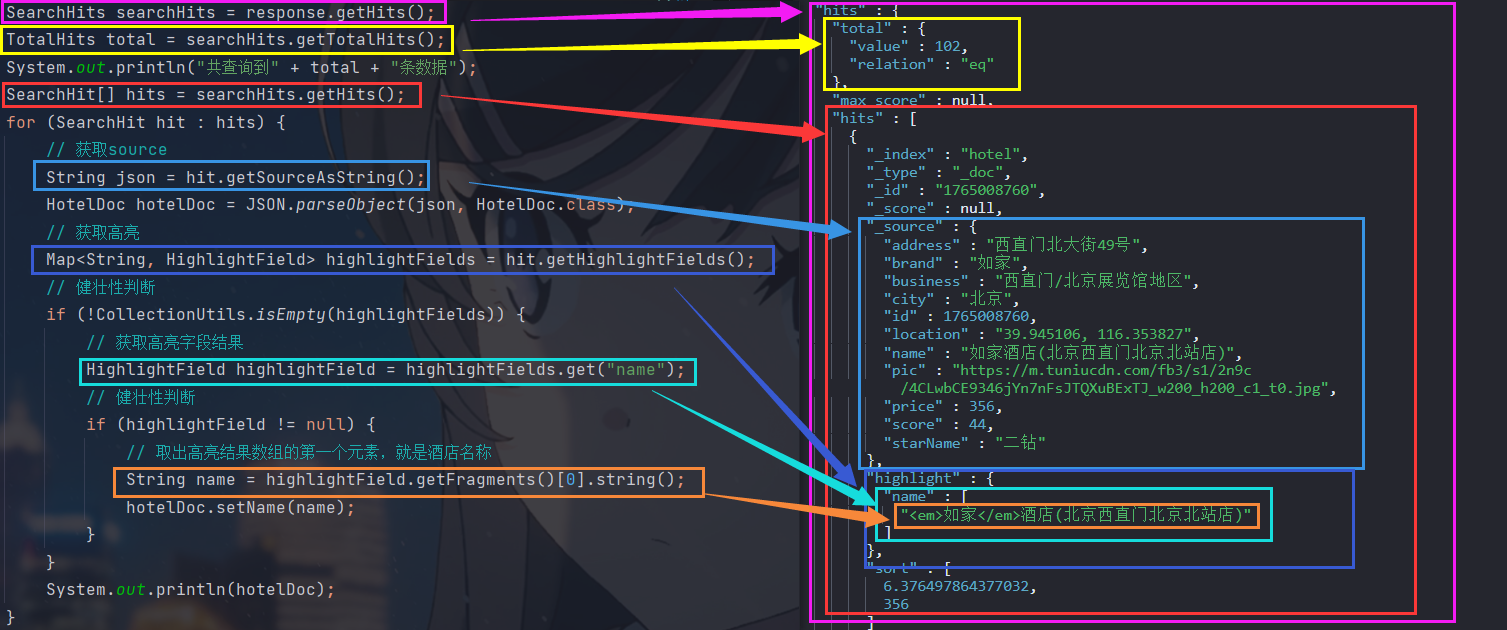
//课程id
Long id = courseIndex.getId();
//取出名称
String name = courseIndex.getName();
//取出高亮字段内容
Map<String, HighlightField> highlightFields = hit.getHighlightFields();
if (highlightFields != null) {
HighlightField nameField = highlightFields.get("name");
if (nameField != null) {
Text[] fragments = nameField.getFragments();
StringBuffer stringBuffer = new StringBuffer();
for (Text str : fragments) {
stringBuffer.append(str.string());
}
name = stringBuffer.toString();
}
}
courseIndex.setId(id);
courseIndex.setName(name);
list.add(courseIndex);
}
SearchPageResultDto<CourseIndex> pageResult = new SearchPageResultDto<>(list, totalHits.value, pageNo, pageSize);
//获取聚合结果
List<String> mtList = getAggregation(searchResponse.getAggregations(), "mtAgg");
List<String> stList = getAggregation(searchResponse.getAggregations(), "stAgg");
pageResult.setMtList(mtList);
pageResult.setStList(stList);
return pageResult;
}
private void buildAggregation(SearchRequest request) {
request.source().aggregation(AggregationBuilders
.terms("mtAgg")
.field("mtName")
.size(100)
);
request.source().aggregation(AggregationBuilders
.terms("stAgg")
.field("stName")
.size(100)
);
}
private List<String> getAggregation(Aggregations aggregations, String aggName) {
// 4.1.根据聚合名称获取聚合结果
Terms brandTerms = aggregations.get(aggName);
// 4.2.获取buckets
List<? extends Terms.Bucket> buckets = brandTerms.getBuckets();
// 4.3.遍历
List<String> brandList = new ArrayList<>();
for (Terms.Bucket bucket : buckets) {
// 4.4.获取key
String key = bucket.getKeyAsString();
brandList.add(key);
}
return brandList;
}
}
- 课程索引接口实现
- config包下只有一个ElasticSearchConfig,主要是提供了一个Java的客户端来操作ES的,将其注册为一个bean
索引管理
REST API
- 索引创建好,就可以向其进行增删改查操作,ElasticSearch会根据所以的mapping配置对对应字段分词
- 添加文档:基本语法如下
1
2
3
4POST /{索引库名}/_doc/{id}
{
json ...
} - 查询文档,基本语法如下
1
GET /{索引库名}/_doc/{id}
- 修改文档,分为全量修改和增量修改
- 全量修改:本质是先根据id删除。在RestClient的API中,全量修改与新增的API完全一致,判断的依据是ID
- 若新增时,ID已经存在,则修改(删除再新增)
- 若新增时,ID不存在,则新增
1
2
3
4POST /{索引库名}/_doc/{id}
{
json ...
}
- 增量修改:修改文档中的指定字段值
1
2
3
4
5
6
7POST /{索引库名}/_update/{id}
{
"doc":{
"email":"BestApex@Apex.net",
"info":"恐怖G7人--马文"
}
}
- 全量修改:本质是先根据id删除。在RestClient的API中,全量修改与新增的API完全一致,判断的依据是ID
- 添加文档:基本语法如下
接口定义
- 当课程发布时,请求添加课程接口,添加课程信息到索引
- 当课程下架时,请求删除课程接口,从索引中删除课程信息
- 这里先实现添加课程接口
- 根据索引的mapping结构构建po类
1
2
3
4
5
6
7
8
9
10
11
12
13
14
15
16
17
18
19
20
21
22
23
24
25
26
27
28
29
30
31
32
33
34
35
36
37
38
39
40
41
42
43
44
45
46
47
48
49
50
51
52
53
54
55
56
57
58
59
60
61
62
63
64
65
66
67
68
69
70
71
72
73
74
75
76
77
78
79
80
81
82
83
84
85
86
87
88
89
90
91
92
93
94
95
96
97
98
99
100
101
102
103
104
105
106
107
108
109
110
111
112
public class CourseIndex implements Serializable {
private static final long serialVersionUID = 1L;
/**
* 主键
*/
private Long id;
/**
* 机构ID
*/
private Long companyId;
/**
* 公司名称
*/
private String companyName;
/**
* 课程名称
*/
private String name;
/**
* 适用人群
*/
private String users;
/**
* 标签
*/
private String tags;
/**
* 大分类
*/
private String mt;
/**
* 大分类名称
*/
private String mtName;
/**
* 小分类
*/
private String st;
/**
* 小分类名称
*/
private String stName;
/**
* 课程等级
*/
private String grade;
/**
* 教育模式
*/
private String teachmode;
/**
* 课程图片
*/
private String pic;
/**
* 课程介绍
*/
private String description;
/**
* 发布时间
*/
private LocalDateTime createDate;
/**
* 状态
*/
private String status;
/**
* 备注
*/
private String remark;
/**
* 收费规则,对应数据字典--203
*/
private String charge;
/**
* 现价
*/
private Float price;
/**
* 原价
*/
private Float originalPrice;
/**
* 课程有效期天数
*/
private Integer validDays;
} - 创建添加课程索引接口
1
2
3
4
5
6
7
8
9
10
11
public class CourseIndexController {
public Boolean add( CourseIndex courseIndex) {
return null;
}
}
- 根据索引的mapping结构构建po类
接口开发
- 定义service接口,请求ES添加课程信息
1
2
3
4
5
6
7
8
9
10
11
12
13
14/**
* 课程索引service
*/
public interface IndexService {
/**
* 添加索引
* @param indexName 索引名称
* @param id 主键
* @param object 索引对象
* @return true:添加成功;false:添加失败
*/
Boolean addCourseIndex(String indexName, String id, Object object);
} - 对应的接口实现如下
1
2
3
4
5
6
7
8
9
10
11
12
13
14
15
16
17
18
19
20
public Boolean addCourseIndex(String indexName, String id, Object object) {
// 1. 创建request对象
IndexRequest request = new IndexRequest(indexName).id(id);
// 2. 准备请求参数,对应DSL语句中的JSON文档,所以要把对象序列化为JSON格式
String jsonString = JSON.toJSONString(object);
request.source(jsonString, XContentType.JSON);
IndexResponse response = null;
try {
// 3. 发送请求
response = client.index(request, RequestOptions.DEFAULT);
} catch (IOException e) {
log.debug("添加索引出错:{}", e.getMessage());
XueChengPlusException.cast("添加索引出错");
}
// 4. 获取请求结果
String result = response.getResult().name();
// 若文档不存在,则为created,若文档存在,则为updated,若两者均不是,就是出错了
return "UPDATED".equalsIgnoreCase(result) || "CREATED".equalsIgnoreCase(result);
}
接口完善
- 完善Controller层,调用Service接口
1
2
3
4
5
6
7
8
9
10
11
12
13
14
15
16
17
18
19
20
21
22
23
24
25
public class CourseIndexController {
private IndexService indexService;
private String courseIndexName;
public Boolean add( CourseIndex courseIndex) {
Long id = courseIndex.getId();
if (id == null) {
XueChengPlusException.cast("课程id为空");
}
Boolean result = indexService.addCourseIndex(courseIndexName, String.valueOf(id), courseIndex);
// 当结果既不是created,又不是updated时,就会报这个错误
if (!result) {
XueChengPlusException.cast("添加课程索引失败!");
}
return true;
}
}
接口测试
- 使用HTTP Client或者POSTMAN进行测试
1
2
3
4
5
6
7
8
9
10
11
12
13
14
15
16
17
18
19
20
21
22
23
24
25
26#### 新增课程文档测试
POST {{search_host}}/search/index/course
Content-Type: application/json
{
"charge" : "201000",
"companyId" : 100000,
"companyName" : "测试CompanyName",
"createDate" : "2023-03-07 15:41:44",
"description" : "《测试测试测试测试》",
"grade" : "204001",
"id" : 102,
"mt" : "1-3",
"mtName" : "编程开发",
"name" : "Java编程思想",
"originalPrice" : 200.0,
"pic" : "/mediafiles/2022/09/20/1d0f0e6ed8a0c4a89bfd304b84599d9c.png",
"price" : 100.0,
"remark" : "没有备注",
"st" : "1-3-2",
"stName" : "Java语言",
"status" : "203002",
"tags" : "没有标签",
"teachmode" : "200002",
"validDays" : 222
}
搜索
需求分析
- 索引信息维护完成下一步定义搜索接口,搜索课程信息
- 首先要搞清楚搜索功能的需求,进入学成在线首页的搜索页面
- 根据搜索页面可知需求如下
- 根据一级分类、二级分类搜索课程信息
- 根据关键字搜索课程信息,搜索方式为全文检索,关键字需要匹配课程的名称、内容
- 根据难度等级搜索课程
- 搜索页面分页显示
- 技术点
- 整体采用布尔查询
- 根据关键字搜索,采用MultiMatchQuery,搜索name、description字段
- 根据分类、课程等级搜索采用过滤器实现
- 分页查询
- 高亮显示
接口定义
- 定义搜索条件DTO类
1
2
3
4
5
6
7
8
9
10
11
12
13
14
15
public class SearchCourseParamDto {
//关键字(搜索条件)
private String keywords;
//大分类
private String mt;
//小分类
private String st;
//难度等级
private String grade;
} - 为了适应后期的扩展,定义搜索结果类,让其继承PageResult
1
2
3
4
5
6
7
8
9
public class SearchPageResultDto<T> extends PageResult {
public SearchPageResultDto(List<T> items, long counts, long page, long pageSize) {
super(items, counts, page, pageSize);
}
} - 定义接口如下
1
2
3
4
5
6
7
8
9
10
11
12
13
14
public class CourseSearchController {
CourseSearchService courseSearchService;
public SearchPageResultDto<CourseIndex> list(PageParams pageParams, SearchCourseParamDto searchCourseParamDto) {
return null;
}
}
接口开发
- 定义Service接口
1
2
3
4
5
6
7
8
9
10
11
12/**
* 课程搜索service
*/
public interface CourseSearchService {
/**
* 搜索课程列表
* @param pageParams 分页参数
* @param searchCourseParamDto 搜索条件
* @return
*/
SearchPageResultDto<CourseIndex> queryCoursePubIndex(PageParams pageParams, SearchCourseParamDto searchCourseParamDto);
} - 接口实现,由于搜索接口的内容比较多,所以这里分几步实现
- 实现根据分页搜索
1
2
3
4
5
6
7
8
9
10
11
12
13
14
15
16
17
18
19
20
21
22
23
24
25
26
27
28
29
30
31
32
33
34
35
36
37
38
39
40
41
42
43
44
45
46
47
48
49
50
51
52
53
54
55
private String courseIndexName;
private String sourceFields;
RestHighLevelClient client;
public SearchPageResultDto<CourseIndex> queryCoursePubIndex(PageParams pageParams, SearchCourseParamDto courseSearchParam) {
// 1. 准备Request对象
SearchRequest request = new SearchRequest(courseIndexName);
// 2. 组织DSL参数,这里使用布尔查询
BoolQueryBuilder boolQuery = QueryBuilders.boolQuery();
String[] sourceFieldsArray = sourceFields.split(",");
SearchSourceBuilder searchSourceBuilder = new SearchSourceBuilder();
// sourceFieldsArray指定要返回的字段,new String[]{}指定不返回的字段
searchSourceBuilder.fetchSource(sourceFieldsArray, new String[]{});
// 3. 分页
Long pageNo = pageParams.getPageNo();
Long pageSize = pageParams.getPageSize();
// 3.1 指定起始查询位置和查询条数
int start = (int) ((pageNo - 1) * pageSize);
searchSourceBuilder.from(start)
.size(Math.toIntExact(pageSize));
// 4. 布尔查询
searchSourceBuilder.query(boolQuery);
request.source(searchSourceBuilder);
// 5. 发送请求,获取响应结果
SearchResponse response = null;
try {
response = client.search(request, RequestOptions.DEFAULT);
} catch (IOException e) {
log.debug("课程搜索异常:{}", e.getMessage());
return new SearchPageResultDto<>(new ArrayList<>(), 0, 0, 0);
}
// 6. 解析响应
SearchHits searchHits = response.getHits();
// 6.1 获取总条数
long totalHits = searchHits.getTotalHits().value;
// 6.2 获取文档数组
SearchHit[] hits = searchHits.getHits();
ArrayList<CourseIndex> list = new ArrayList<>();
// 6.3 遍历
for (SearchHit hit : hits) {
// 获取文档source
String jsonCourseString = hit.getSourceAsString();
// 转为CourseIndex对象,加入到集合中
CourseIndex courseIndex = JSON.parseObject(jsonCourseString, CourseIndex.class);
list.add(courseIndex);
}
// 7. 封装结果
SearchPageResultDto<CourseIndex> pageResult = new SearchPageResultDto<>(list, totalHits, pageNo, pageSize);
return pageResult;
}
- 实现根据分页搜索
- 代码与DSL语句对应如下
(偷个懒用以前的文章的图)
基本功能测试
- 当输入查询条件是,会查询全部课程信息,并支持分页查询
根据条件搜索
- 下面实现根据关键字、一级分类、二级分类、难度等级搜索
1
2
3
4
5
6
7
8
9
10
11
12
13
14
15
16
17
18
19
20
21
22
23
24
25
26
27
28
29
30
31
32
33
34
35
36
37
38
39
40
41
42
43
44
45
46
47
48
49
50
51
52
53
54
55
56
57
58
59
60
61
62
63
64
65
66
67
68
69
70
71
72
73
74@Override
public SearchPageResultDto<CourseIndex> queryCoursePubIndex(PageParams pageParams, SearchCourseParamDto courseSearchParam) {
// 1. 准备Request对象
SearchRequest request = new SearchRequest(courseIndexName);
// 2. 组织DSL参数,这里使用布尔查询
BoolQueryBuilder boolQuery = QueryBuilders.boolQuery();
String[] sourceFieldsArray = sourceFields.split(",");
SearchSourceBuilder searchSourceBuilder = new SearchSourceBuilder();
// sourceFieldsArray指定要返回的字段,new String[]{}指定不返回的字段
searchSourceBuilder.fetchSource(sourceFieldsArray, new String[]{});
// 3. 分页
Long pageNo = pageParams.getPageNo();
Long pageSize = pageParams.getPageSize();
+ // 3.1 指定起始查询位置和查询条数
+ int start = (int) ((pageNo - 1) * pageSize);
+ searchSourceBuilder.from(start)
+ .size(Math.toIntExact(pageSize));
+ // 3.2 指定条件查询
+ if (courseSearchParam == null) {
+ courseSearchParam = new SearchCourseParamDto();
+ }
+ // 3.2.1 匹配关键字
+ if (StringUtils.isNotEmpty(courseSearchParam.getKeywords())){
+ String keywords = courseSearchParam.getKeywords();
+ boolQuery.must(QueryBuilders
+ .multiMatchQuery(keywords,"name", "description")
+ .minimumShouldMatch("70%")
+ .field("name", 10));
+ }
+ // 3.2.2 匹配大分类
+ if (StringUtils.isNotEmpty(courseSearchParam.getMt())){
+ boolQuery.filter(QueryBuilders
+ .termQuery("mtName", courseSearchParam.getMt()));
+ }
+ // 3.2.3 匹配小分类
+ if (StringUtils.isNotEmpty(courseSearchParam.getSt())){
+ boolQuery.filter(QueryBuilders
+ .termQuery("stName", courseSearchParam.getSt()));
+ }
+ // 3.2.4 匹配难度
+ if (StringUtils.isNotEmpty(courseSearchParam.getGrade())){
+ boolQuery.filter(QueryBuilders
+ .termQuery("grade", courseSearchParam.getGrade()));
+ }
// 4. 布尔查询
searchSourceBuilder.query(boolQuery);
request.source(searchSourceBuilder);
// 5. 发送请求,获取响应结果
SearchResponse response = null;
try {
response = client.search(request, RequestOptions.DEFAULT);
} catch (IOException e) {
log.debug("课程搜索异常:{}", e.getMessage());
return new SearchPageResultDto<>(new ArrayList<>(), 0, 0, 0);
}
// 6. 解析响应
SearchHits searchHits = response.getHits();
// 6.1 获取总条数
long totalHits = searchHits.getTotalHits().value;
// 6.2 获取文档数组
SearchHit[] hits = searchHits.getHits();
ArrayList<CourseIndex> list = new ArrayList<>();
// 6.3 遍历
for (SearchHit hit : hits) {
// 获取文档source
String jsonCourseString = hit.getSourceAsString();
// 转为CourseIndex对象,加入到集合中
CourseIndex courseIndex = JSON.parseObject(jsonCourseString, CourseIndex.class);
list.add(courseIndex);
}
// 7. 封装结果
SearchPageResultDto<CourseIndex> pageResult = new SearchPageResultDto<>(list, totalHits, pageNo, pageSize);
return pageResult;
}
条件搜索测试
- 进入搜索界面,输入关键字进行测试,点击分类测试
聚合搜索
- 搜索页面上显示的一级分类、二级分类来源于搜索结果,使用聚合搜索实现找到搜索结果中的一级分类、二级分类
- 首先在搜索结果DTO类中添加一级分类、二级分类列表
1
2
3
4
5
6
7
8
9
10
11
12
13
14@Data
@ToString
public class SearchPageResultDto<T> extends PageResult {
+ //大分类列表
+ List<String> mtList;
+ //小分类列表
+ List<String> stList;
public SearchPageResultDto(List<T> items, long counts, long page, long pageSize) {
super(items, counts, page, pageSize);
}
} - 搜索方法如下
1
2
3
4
5
6
7
8
9
10
11
12
13
14
15
16
17
18
19
20
21
22
23
24
25
26
27
28
29
30
31
32
33
34
35
36
37
38
39
40
41
42
43
44
45
46
47
48
49
50
51
52
53
54
55
56
57
58
59
60
61
62
63
64
65
66
67
68
69
70
71
72
73
74
75
76
77
78
79
80
81
82
83
84
85
86
87
88
89
90
91
92
93
94
95
96
97
98
99
100
101
102
103
104
105
106
107
108
109
110
111
112
113
114
115
116@Override
public SearchPageResultDto<CourseIndex> queryCoursePubIndex(PageParams pageParams, SearchCourseParamDto courseSearchParam) {
// 1. 准备Request对象
SearchRequest request = new SearchRequest(courseIndexName);
// 2. 组织DSL参数,这里使用布尔查询
BoolQueryBuilder boolQuery = QueryBuilders.boolQuery();
String[] sourceFieldsArray = sourceFields.split(",");
SearchSourceBuilder searchSourceBuilder = new SearchSourceBuilder();
// sourceFieldsArray指定要返回的字段,new String[]{}指定不返回的字段
searchSourceBuilder.fetchSource(sourceFieldsArray, new String[]{});
// 3. 分页
Long pageNo = pageParams.getPageNo();
Long pageSize = pageParams.getPageSize();
// 3.1 指定起始查询位置和查询条数
int start = (int) ((pageNo - 1) * pageSize);
searchSourceBuilder.from(start)
.size(Math.toIntExact(pageSize));
// 3.2 指定条件查询
if (courseSearchParam == null) {
courseSearchParam = new SearchCourseParamDto();
}
// 3.2.1 匹配关键字
if (StringUtils.isNotEmpty(courseSearchParam.getKeywords())){
String keywords = courseSearchParam.getKeywords();
boolQuery.must(QueryBuilders
.multiMatchQuery(keywords,"name", "description")
.minimumShouldMatch("70%")
.field("name", 10));
}
// 3.2.2 匹配大分类
if (StringUtils.isNotEmpty(courseSearchParam.getMt())){
boolQuery.filter(QueryBuilders
.termQuery("mtName", courseSearchParam.getMt()));
}
// 3.2.3 匹配小分类
if (StringUtils.isNotEmpty(courseSearchParam.getSt())){
boolQuery.filter(QueryBuilders
.termQuery("stName", courseSearchParam.getSt()));
}
// 3.2.4 匹配难度
if (StringUtils.isNotEmpty(courseSearchParam.getGrade())){
boolQuery.filter(QueryBuilders
.termQuery("grade", courseSearchParam.getGrade()));
}
// 4. 布尔查询
searchSourceBuilder.query(boolQuery);
request.source(searchSourceBuilder);
+ // 聚合设置
+ buildAggregation(request);
// 5. 发送请求,获取响应结果
SearchResponse response = null;
try {
response = client.search(request, RequestOptions.DEFAULT);
} catch (IOException e) {
log.debug("课程搜索异常:{}", e.getMessage());
return new SearchPageResultDto<>(new ArrayList<>(), 0, 0, 0);
}
// 6. 解析响应
SearchHits searchHits = response.getHits();
// 6.1 获取总条数
long totalHits = searchHits.getTotalHits().value;
// 6.2 获取文档数组
SearchHit[] hits = searchHits.getHits();
ArrayList<CourseIndex> list = new ArrayList<>();
// 6.3 遍历
for (SearchHit hit : hits) {
// 获取文档source
String jsonCourseString = hit.getSourceAsString();
// 转为CourseIndex对象,加入到集合中
CourseIndex courseIndex = JSON.parseObject(jsonCourseString, CourseIndex.class);
list.add(courseIndex);
}
// 7. 封装结果
+ List<String> mtList = getAggregation(response.getAggregations(), "mtAgg");
+ List<String> stList = getAggregation(response.getAggregations(), "stAgg");
SearchPageResultDto<CourseIndex> pageResult = new SearchPageResultDto<>(list, totalHits, pageNo, pageSize);
+ pageResult.setMtList(mtList);
+ pageResult.setStList(stList);
return pageResult;
}
+ private void buildAggregation(SearchRequest request) {
+ request.source().aggregation(AggregationBuilders
+ .terms("mtAgg")
+ .field("mtName")
+ .size(100)
+ );
+ request.source().aggregation(AggregationBuilders
+ .terms("stAgg")
+ .field("stName")
+ .size(100)
+ );
+ }
+ /**
+ * 根据聚合名称获取聚合结果
+ * @param aggregations 聚合对象
+ * @param aggName 聚合名称
+ * @return 聚合结果,返回List集合
+ */
+ private List<String> getAggregation(Aggregations aggregations, String aggName) {
+ // 1. 根据聚合名称获取聚合结果
+ Terms brandTerms = aggregations.get(aggName);
+ // 2. 获取buckets
+ List<? extends Terms.Bucket> buckets = brandTerms.getBuckets();
+ // 3. 遍历
+ List<String> brandList = new ArrayList<>();
+ for (Terms.Bucket bucket : buckets) {
+ // 4. 获取key
+ String key = bucket.getKeyAsString();
+ // 5. 加入到集合中
+ brandList.add(key);
+ }
+ return brandList;
+ }
- 首先在搜索结果DTO类中添加一级分类、二级分类列表
聚合搜索测试
- 进入搜索界面,观察搜索请求的响应内容中是否存在mtList和stList
高亮设置
- 最后实现关键字在课程名称中高亮显示
1
2
3
4
5
6
7
8
9
10
11
12
13
14
15
16
17
18
19
20
21
22
23
24
25
26
27
28
29
30
31
32
33
34
35
36
37
38
39
40
41
42
43
44
45
46
47
48
49
50
51
52
53
54
55
56
57
58
59
60
61
62
63
64
65
66
67
68
69
70
71
72
73
74
75
76
77
78
79
80
81
82
83
84
85
86
87
88
89
90
91
92
93
94
95
96
97
98
99
100
101
102
103@Override
public SearchPageResultDto<CourseIndex> queryCoursePubIndex(PageParams pageParams, SearchCourseParamDto courseSearchParam) {
log.debug("ES条件查询并响应分页结果");
// 1. 准备Request对象
SearchRequest request = new SearchRequest(courseIndexName);
// 2. 组织DSL参数,这里使用布尔查询
BoolQueryBuilder boolQuery = QueryBuilders.boolQuery();
String[] sourceFieldsArray = sourceFields.split(",");
SearchSourceBuilder searchSourceBuilder = new SearchSourceBuilder();
// sourceFieldsArray指定要返回的字段,new String[]{}指定不返回的字段
searchSourceBuilder.fetchSource(sourceFieldsArray, new String[]{});
// 3. 分页
Long pageNo = pageParams.getPageNo();
Long pageSize = pageParams.getPageSize();
// 3.1 指定起始查询位置和查询条数
int start = (int) ((pageNo - 1) * pageSize);
searchSourceBuilder.from(start)
.size(Math.toIntExact(pageSize));
// 3.2 指定条件查询
if (courseSearchParam == null) {
courseSearchParam = new SearchCourseParamDto();
}
// 3.2.1 匹配关键字
if (StringUtils.isNotEmpty(courseSearchParam.getKeywords())) {
String keywords = courseSearchParam.getKeywords();
boolQuery.must(QueryBuilders
.multiMatchQuery(keywords, "name", "description")
.minimumShouldMatch("70%")
.field("name", 10));
}
// 3.2.2 匹配大分类
if (StringUtils.isNotEmpty(courseSearchParam.getMt())) {
boolQuery.filter(QueryBuilders
.termQuery("mtName", courseSearchParam.getMt()));
}
// 3.2.3 匹配小分类
if (StringUtils.isNotEmpty(courseSearchParam.getSt())) {
boolQuery.filter(QueryBuilders
.termQuery("stName", courseSearchParam.getSt()));
}
// 3.2.4 匹配难度
if (StringUtils.isNotEmpty(courseSearchParam.getGrade())) {
boolQuery.filter(QueryBuilders
.termQuery("grade", courseSearchParam.getGrade()));
}
// 4. 布尔查询
searchSourceBuilder.query(boolQuery);
+ // 高亮
+ searchSourceBuilder.highlighter(new HighlightBuilder()
+ .field("name")
+ .preTags("<font class='eslight'>")
+ .postTags("</font>"));
request.source(searchSourceBuilder);
// 聚合设置
buildAggregation(request);
// 5. 发送请求,获取响应结果
SearchResponse response = null;
try {
response = client.search(request, RequestOptions.DEFAULT);
} catch (IOException e) {
log.debug("课程搜索异常:{}", e.getMessage());
return new SearchPageResultDto<>(new ArrayList<>(), 0, 0, 0);
}
// 6. 解析响应
SearchHits searchHits = response.getHits();
// 6.1 获取总条数
long totalHits = searchHits.getTotalHits().value;
// 6.2 获取文档数组
SearchHit[] hits = searchHits.getHits();
ArrayList<CourseIndex> list = new ArrayList<>();
// 6.3 遍历
for (SearchHit hit : hits) {
// 获取文档source
String jsonCourseString = hit.getSourceAsString();
// 转为CourseIndex对象
CourseIndex courseIndex = JSON.parseObject(jsonCourseString, CourseIndex.class);
+ // 获取高亮
+ Map<String, HighlightField> highlightFields = hit.getHighlightFields();
+ log.debug("获取高亮:{}", highlightFields);
+ String name = courseIndex.getName();
+ // 健壮性判断
+ if (!CollectionUtils.isEmpty(highlightFields)) {
+ // 获取高亮字段结果
+ HighlightField highlightField = highlightFields.get("name");
+ log.debug("成功获取高亮字段");
+ // 健壮性判断
+ if (highlightField != null) {
+ log.debug("取出高亮结果数组的第一个");
+ // 取出高亮结果数组的第一个
+ name = highlightField.getFragments()[0].toString();
+ }
+ }
+ courseIndex.setName(name);
list.add(courseIndex);
}
// 7. 封装结果
List<String> mtList = getAggregation(response.getAggregations(), "mtAgg");
List<String> stList = getAggregation(response.getAggregations(), "stAgg");
SearchPageResultDto<CourseIndex> pageResult = new SearchPageResultDto<>(list, totalHits, pageNo, pageSize);
pageResult.setMtList(mtList);
pageResult.setStList(stList);
return pageResult;
}
高亮设置测试
- 输入关键字,观察搜索结果、标题中是否对关键字进行了高亮显示
- 输入框搜索Python,查看控制台
课程发布任务完善
需求分析
- 执行课程发布操作后,由消息处理机制向ElasticSearch索引保存课程信息
- 由内容管理服务远程调用搜索服务,添加课程信息索引
- 搜索服务请求ElasticSearch添加课程信息
课程索引任务开发
- 在内容管理服务中添加FeignClient
1
2
3
4
5
6
7
public interface SearchServiceClient {
Boolean add( CourseIndex courseIndex);
} 编写课程索引任务执行方法,在课程发布Service中定义保存课程索引方法
- 定义Service接口
1
2
3
4
5
6/**
* 保存课程索引
* @param courseId 课程id
* @return
*/
Boolean saveCourseIndex(Long courseId); - 对应的实现方法
1
2
3
4
5
6
7
8
9
10
11
12
13
14
public Boolean saveCourseIndex(Long courseId) {
// 1. 取出课程发布信息
CoursePublish coursePublish = coursePublishMapper.selectById(courseId);
// 2. 拷贝至课程索引对象
CourseIndex courseIndex = new CourseIndex();
BeanUtils.copyProperties(coursePublish, courseIndex);
// 3. 远程调用搜索服务API,添加课程索引信息
Boolean result = searchServiceClient.add(courseIndex);
if (!result) {
XueChengPlusException.cast("添加索引失败");
}
return true;
}
- 定义Service接口
完善CoursePublishTask类中的saveCourseIndex方法
1
2
3
4
5
6
7
8
9
10
11
12
13
14
15
16
17
18public void saveCourseIndex(MqMessage mqMessage, Long courseId) {
log.debug("正在保存课程信息索引,课程id:{}", courseId);
// 1. 获取消息id
Long id = mqMessage.getId();
// 2. 获取小任务阶段状态
MqMessageService mqMessageService = this.getMqMessageService();
int stageTwo = mqMessageService.getStageTwo(id);
// 3. 当前小任务完成,无需再次处理
if (stageTwo == 1) {
log.debug("当前阶段为创建课程索引任务,已完成,无需再次处理,任务信息:{}", mqMessage);
return;
}
// 4. 远程调用保存课程索引接口,将课程信息上传至ElasticSearch
Boolean result = coursePublishService.saveCourseIndex(courseId);
if (result) {
mqMessageService.completedStageTwo(id);
}
}
测试
- 发布一门课程,观察该课程信息是否正常添加到索引中
面试
评论

